
Acrylic yarn has been a staple in my yarn stash for years. It is cheap, easily accessible and makes for great projects. But when it comes to blocking, there are so many different opinions out there that I usually opt to skip that step. Some say you should never block, others say you should. What’s the deal?!
The best method to block acrylic yarn is with heat, no matter if the piece is knit or crochet. The heat makes the fibers more susceptible to straightening out. Steam blocking or blocking with a hair dryer yield similar results.
Acrylic yarn can be blocked, and depending on the project, should always be blocked. I know there are many people on the internet that say you shouldn’t ever block acrylic because it doesn’t need it, or it will “kill” the fibers. But don’t listen to them. You just have to block acrylic yarn in a different way than wool or other natural fibers.
I took it upon myself to get to the bottom of the blocking acrylic yarn debate. I made 12 swatches out of acrylic yarn, 6 crochet and 6 knit, in order to test 5 different blocking methods. I was able to find out the best way and I am eager to share that with you! Let’s begin!
A second experiment was conducted and filmed. Scroll to the bottom to see all of the updates to the first experiment, and watch the 2nd experiment here. Keep in mind though this experiment was not perfect either, but I do believe that more accurate results were achieved.
The Best Method for Blocking Acrylic Yarn
We’re going to dive in head first and begin with the best method of blocking acrylic yarn. Trust me, this actually works! Let’s just get a few details out of the way first.
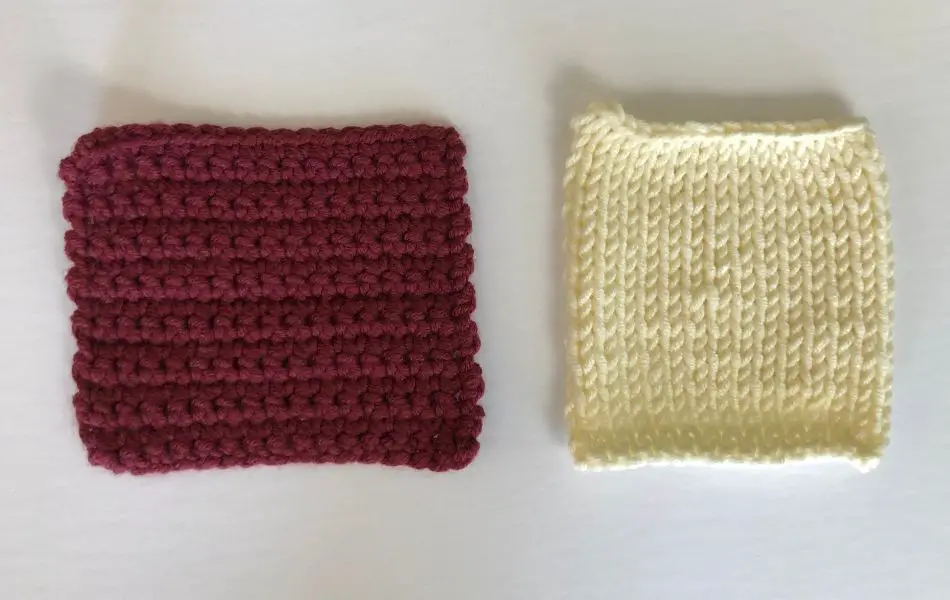
I used Lion Brand Color Made Easy yarn. It is 100% acrylic and a category 5, or bulky weight yarn. I also decided to make swatches for both knit and crochet to test if one method works better for one or the other. All crochet swatches are single crochet stitches made out of the reddish color and all of the cream color swatches are knit in stockinette. Now let’s look at the results from the experiment.
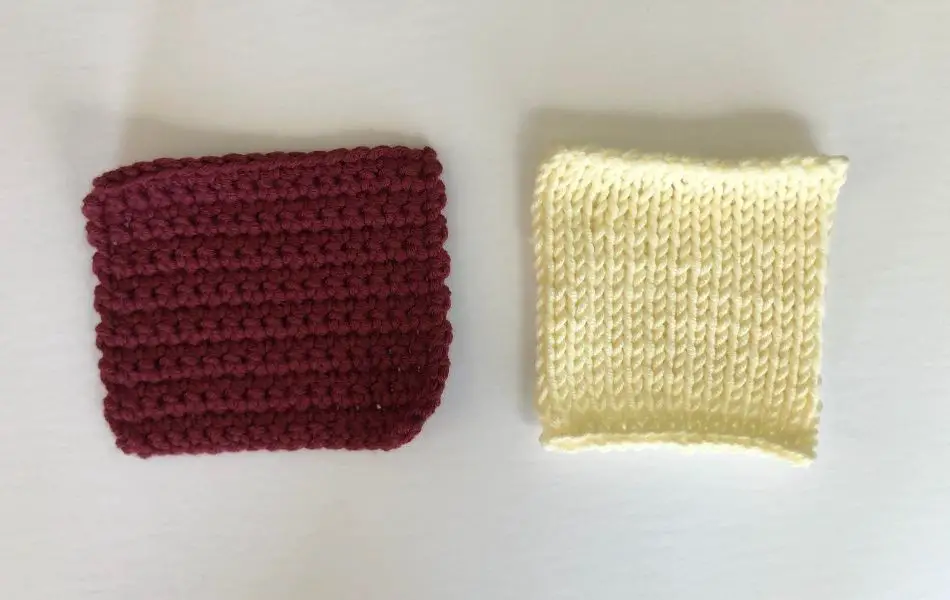
I found that the best way to block acrylic yarn is with a hair dryer for both knit and crochet. Yes, a hair dryer. Let’s look at the comparison. The photo that follows is what the swatches looked like before blocking occured. Many curves and curls going on.
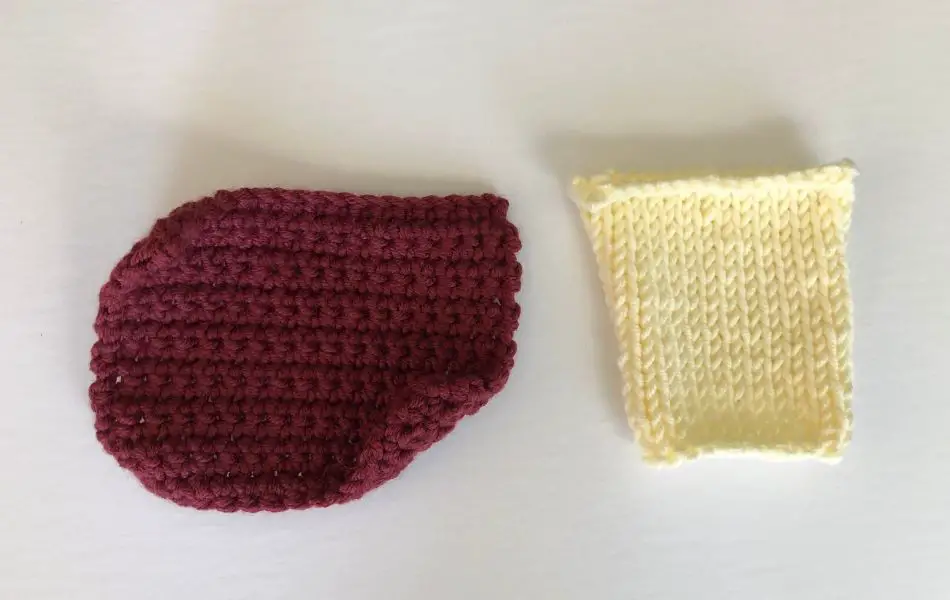
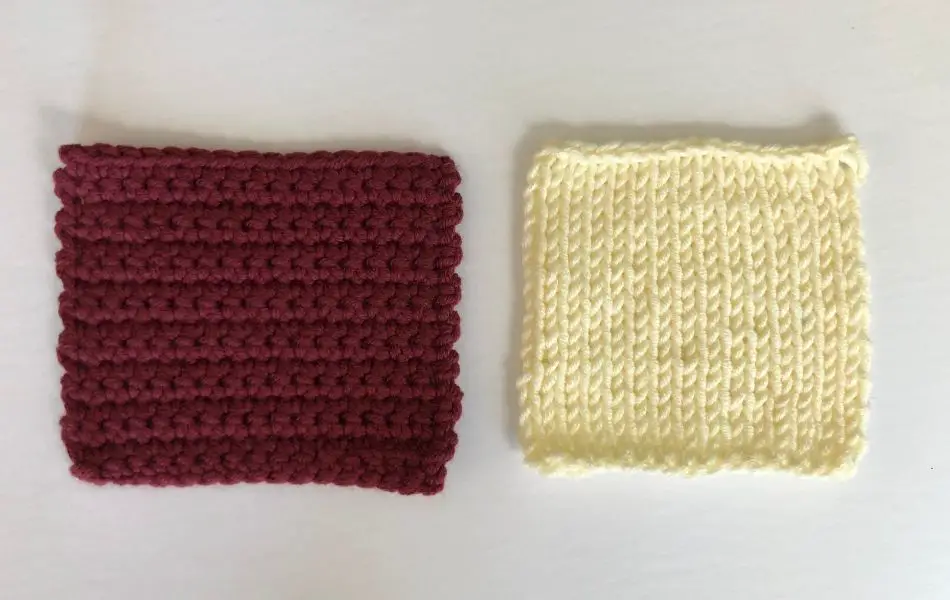
Now look at the results of blocking the swatches with a hair dryer. Both swatches flattened out nicely and the edges straightened up.
I was skeptical whether this method would work or not. There are several reviews online that say this works, yet others claim you can “kill” the acrylic with heat and ruin the fabric on accident. But it does work! For reference “killing” acrylic means you melt the fibers so much they become limp and drape and no longer stretch (good for lace).
Blocking acrylic yarn with a hair dryer is simple. The best part is, you don’t have to wait for the piece to dry! You have a piece of fabric ready to go almost immediately. For those curious, I have outlined the steps needed to block acrylic with a hair dryer below.
- Lay out your fabric and pin into the desired shape.
- Plug in the hair dryer and turn it on to the high heat setting. Although, you could use a lower heat setting if you’re afraid of “killing” the acrylic. I used the high setting.
- Next, hover the hair dryer a few inches above the fabric.
- Move back and forth across the fabric, making sure to focus on the edges too. Do this for a couple of minutes.
- Press on the fabric to smooth out the edges.
- Turn off the hair dryer and let the fabric cool before removing the pins.
See how easy this is? Just pay attention to how the fabric is responding and focus on the trouble areas and use your free hand to press out the curls. But don’t hold the heat in one spot for too long. Keep moving it around so you don’t harm the fabric.
Other Blocking Methods for Acrylic Yarn
As I stated previously, the best method for blocking acrylic yarn is with a hair dryer. However, I tested out fivr methods for blocking acrylic yarn, so let’s talk about the other four. Take a look at the table and see how the other methods ranked.
Acrylic Blocking Methods Ranked Best to Worst
| Crochet | Knit |
| Hair Dryer | Hair Dryer |
| Wet Blocking | Washer/Dryer |
| Washer/Dryer | Spray Blocking |
| Steam Blocking | Steam Blocking |
| Spray Blocking | Wet Blocking |
I was surprised by the results. Everything I read online said spray blocking or steam blocking was the best method to block acrylic yarn. None of them said it was worth the effort to wet block. Nor did they mention throwing the fabric in the washer and dryer, which is what you would do with the finished piece anyway.
I’m going to cover each method further and compare the results for knitting and crochet. As I have already covered the hair dryer method, let’s take a look at wet blocking.
Wet Blocking
Let’s first define what wet blocking is so we are all clear by what I mean. Wet blocking means that the fabric is soaked in water for a short period of time before getting transferred to blocking mats. Then pins (if necessary) are used to keep the fabric in place while it dries. For more information on this, I have an article about wet blocking that you can read about here.
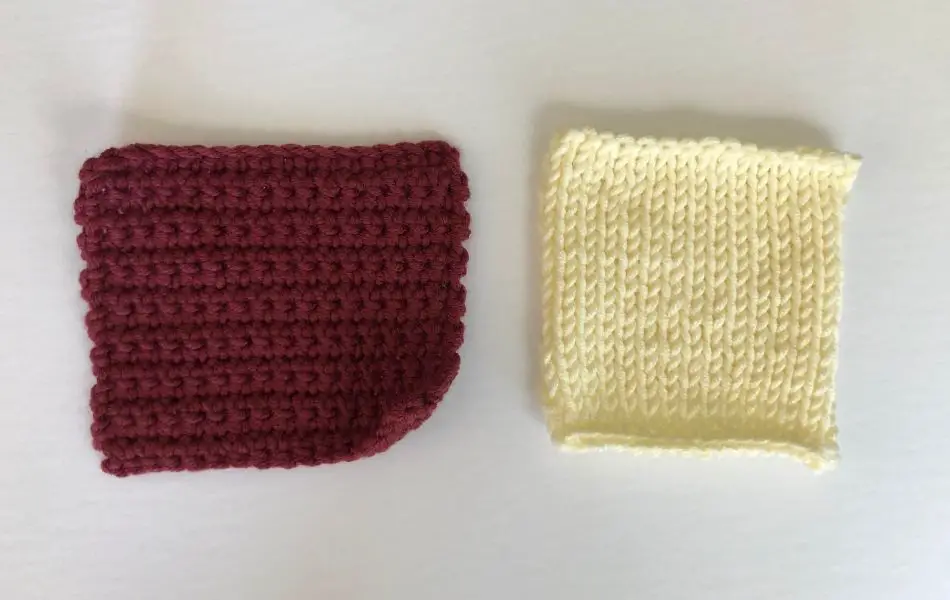
Wet blocking is the next best method for blocking crochet, according to my experiment. You can see in the photo below how the top left and bottom right corner of the crochet swatch curled up slightly after blocking. It’s barely noticeable though, don’t you think? I would highly recommend wet blocking for crochet as the next best method.
Knitting, on the other hand, which is the swatch on the right, did not have the same results as the crochet swatch. Wet blocking didn’t help the knit swatch as much, in fact I found this the least effective method for knitting. Notice how the top and bottom portions of the swatch curled upward and the sides curve backward. It wasn’t as bad as the original, but the curling is still really noticeable.
Washer and Dryer Method
I came up with the washer and dryer method after reading a few forum posts about blocking other fibers. I thought it was worth a shot since the time would eventually come for washing the fabric. So why spend extra time to block fabric if the washing machine and dryer will do it for you?
Here’s how the method works:
- Throw the fabric in the washing machine. (I put mine in with other items that needed washing so I didn’t waste water)
- Toss the fabric in the dryer. (I put mine in with the rest of clothes)
- Remove the fabric when it’s still slightly damp.
- Place the fabric on a flat surface and press the fabric down flat.
- Let dry.
I wasn’t sure if this method would actually work. I thought the heat from the dryer might make the edges curl more, but that is not what I found. Here is a snapshot of the crochet swatch next to the knit swatch.
The washer and dryer method worked better for the knit swatch, in fact, this was the second best method for knitting. The top and bottom of the swatch lays flatter than the rest of the swatches. Also, the troublsome edges seemed to not curl as much compared to the others (minus the hair dryer method).
As for crochet, the washer and dryer method is ranked #3. It’s not the best, but not the worst method. The top left and bottom right corner still wanted to curl up after drying. But it looks way better than the originals.
Steam Blocking
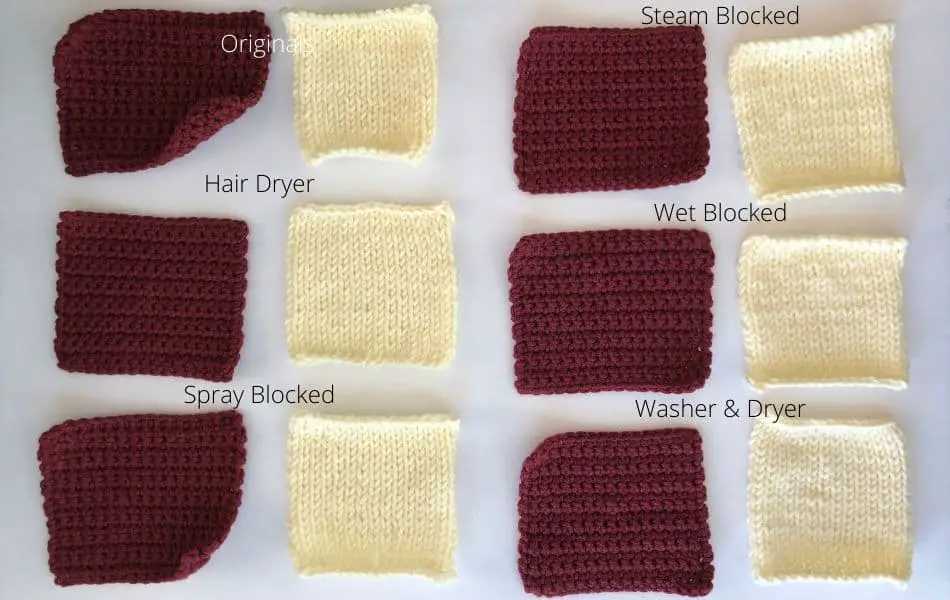
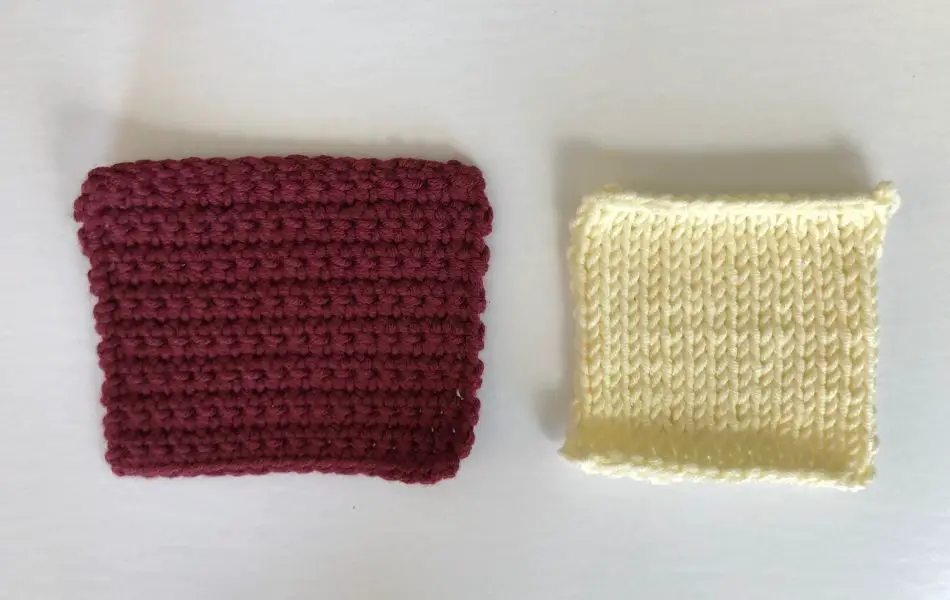
The results for steam blocking surprised me because there are many sources out there that suggest it. In my experiment, steam blocking was one of the worst methods for blocking acrylic. Take a look for yourself in the picture below.
Steam blocking worked about the same for crochet and knitting. It ranked #4 for both. The corners of the crochet fabric curled more compared to other blocking methods. And the knit swatch didn’t respond well to this method. The edges curl back like a scroll and the top and bottom portions curve upward.
Oh, I just realized I didn’t mention how or what steam blocking is. Let me explain for those that are not familiar with this method before you go on to the next section.
Steam blocking uses steam rather than straight up water to soften the fibers and set the stitches. A steamer or iron (with a steam setting) is held a few inches above the fabric (it should be pinned down if necessary) and moved back and forth until the piece is saturated in steam. You can press on the edges to help straighten. Then you let it dry.
Spray Blocking
The results for spray blocking surprised me the most because nearly every source I read online recommended spray blocking over the others. These are not the results that I found true. Just look at those edges curling!
Spray blocking was the worst method for crochet and #3 for knitting. Both of the swatches still had significant curling around the edges. I would not recommend this method for crochet. I think wet blocking is the better route to go. As for knitting, spray blocking could work, but as I’ve mentioned previously, there are better methods.
Spray blocking is a combination of wet and steam blocking. The swatch is pinned down then sprayed with water from a spray bottle, similar to steam blocking. However, the piece becomes covered in water, almost like wet blocking. Then the piece must dry before unpinning.
Caveats to the Experiment
There are a few caveats I think are necessary to mention. I’m not perfect, nor was my experiment. These were just the results I got from my current situation. I have a few things to keep in mind when you block acrylic on your own. Your results could differ for these reasons.
- Yarn weight. I only used bulky weight (5) yarn across the whole experiment. Results could vary for other yarn weights.
- Steam blocking with steamer or iron. I don’t have a steamer, so I had to use the steam setting on my iron. Results could be different if I used a steamer next time.
- Blocking mats. Unfortunately, at this time I do not own a set of blocking mats. I used towels and straight pins instead. This could affect the results because the pins in a towel give more than pins on a sturdy mat.
- Tension. We all crochet and knit differently. The way I make swatches could be different from you. Depending on tension, the fabric might have a lot of curl or not much, which will affect the results from blocking. If you find a lot of curl in your crochet pieces, I wrote an article that shows methods to prevent curling and I will link it here for you.
- Consistency. I tried to stay consistent with the amount of time I used the hair dryer and steam setting on the knit and crochet swatches. I also tried to block each piece equally, concentrating mostly on the edges. However, due to human error, I may not have been consistent enough which could affect the results.
Updated January 2021
That experiment was so fun! In fact, I did the experiment again in January 2021. I even filmed it this time. I’ve wondered for so long if blocking acrylic is even worth it because of the blog posts I’ve read, but I found out that it is. Blocking acrylic yarn improves the look of both crochet and knit fabric, no matter the method you choose.
As I stated in the previous section, there were many different factors that could affect the results I got from the first experiment. This was the reason for the second experiment. This is a list of everything that was updated:
- Steamer. I found a cheap steamer that I used instead of the steam setting on my iron.
- Spray bottle. I did not have a spray bottle for the first experiment. I dipped my fingers in water and sprinkled it onto the fabric. I bought a spray bottle and used it for the second experiment though.
- Blocking mats. I mentioned above that I used towels in the first experiment. Recently I found that Michaels carries blocking mats and purchased myself a few.
- Yarn weight. I used a different yarn weight, a #4, rather than a #5 like the first experiment. I do know that this could affect the results since a #4 is more likely to curl.
Here are the results we have been waiting for! I will compare the first experiment results with the second experiment results.
In the first experiment I found that the best method for blocking knit and crochet fabric is using a hair dryer. No other method was as good. However, that’s not to say other methods didn’t work. They did.
In the second experiment, I found that the best method for blocking knit and crochet fabric is using steam. The other methods varied, but just like the first experiment, some type of blocking was better than none.
The swatches are in order of best blocking methods to worst (left to right).
Knit Swatches
First experiment results.
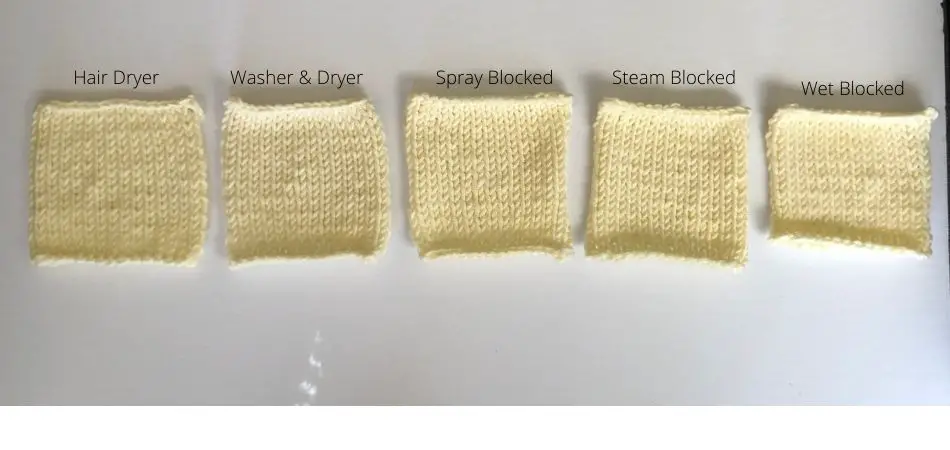
Second experiment results.
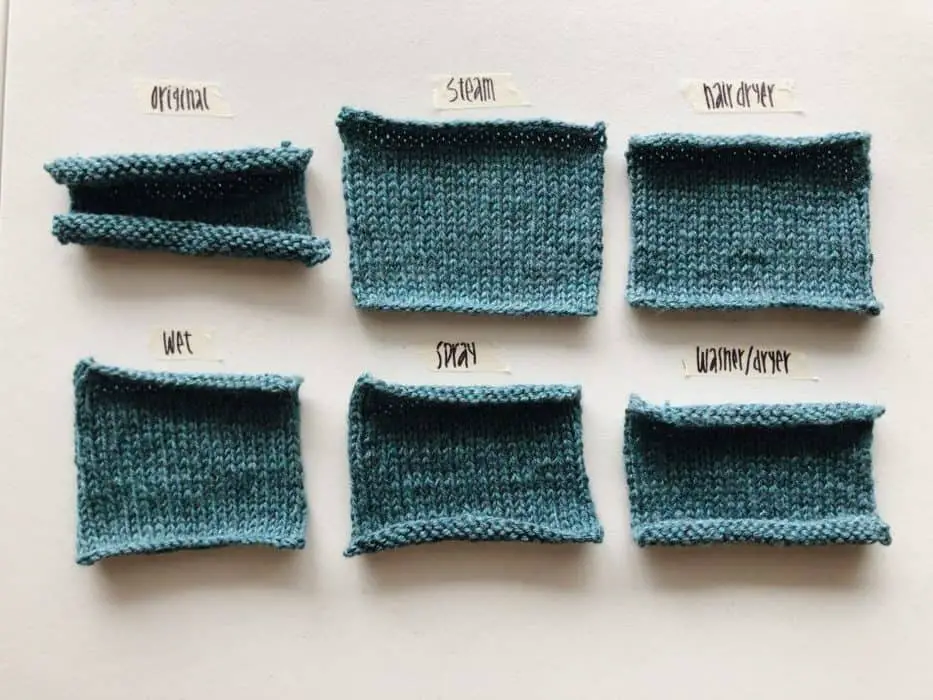
It seems to me that when it comes to knitting and blocking, heat plays an important role in straightening out the stitches. This is evident in both experiments.
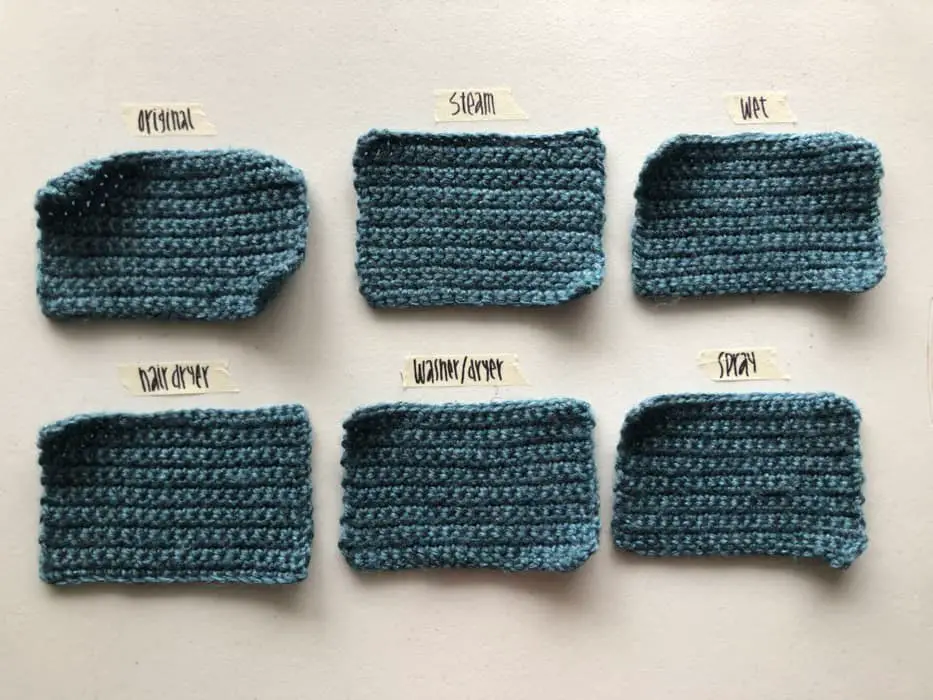
Crochet Swatches
First experiment results.
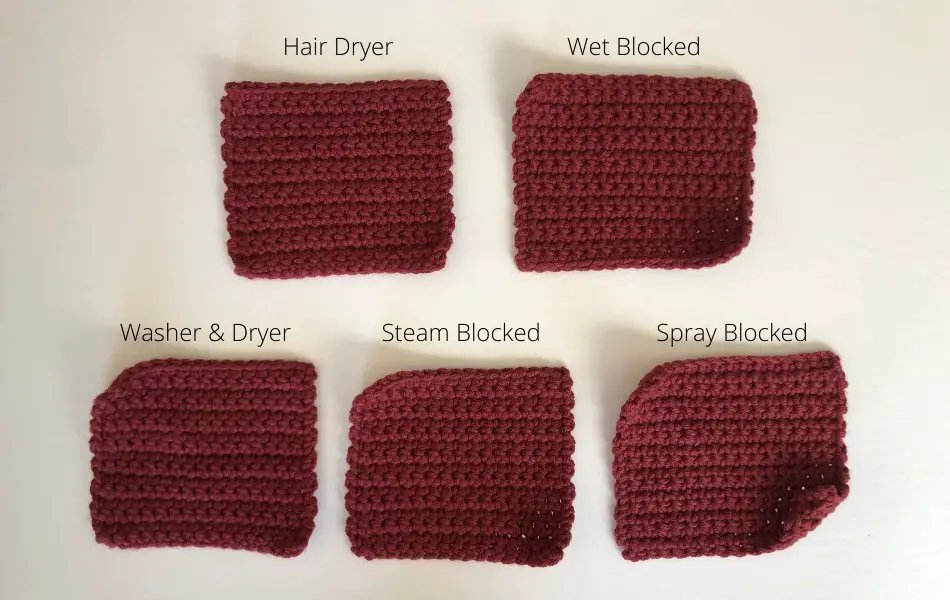
Second experiment results.
I hope you have learned something and that you can apply these findings to your own projects. Don’t just take my word for it! Experiment on your own and let me know if you get the same results.
Until next time, happy crafting!
Recent Posts
The Sole Hat: A Classic Knit-Look Hat Crochet Style | Free Pattern + Tutorial
If you're a crochet enthusiast looking for a timeless, cozy hat pattern with a unique twist, you're in the right place! Introducing Sole, the crochet version of the classic, chunky 2x1 knit ribbed...
Twofold is the Sew Homey take on a classic, chunky knit-ribbed hat with a folded brim. It features the same unique stitch combination and short rows as the Sole hat, but with a modification of stitch...