
Have you ever had that crochet project that just won’t cooperate? The edges curl or the project doesn’t lay flat and you just can’t figure out why this is happening! It is so frustrating, trust me I’ve been there.
The most common reasons crochet edges curl is because tension is too tight (gauge is off), the foundation chain stitches are too tight, there are not enough stitches crocheted in the round, and increases or decreases are inconsistently crocheted in the round. To remedy the problem easily, block or add borders to the project at the end.
When crochet edges curl, there is always a reason. Some reasons are easy to fix and prevent, others not so much.
In this post I will cover the reasons why crochet edges curl, how you can prevent your edges from curling and what to do if your project has curly edges but is too far along to start over. I will also introduce the stitches that have a tendency to curl so you can plan your projects accordingly.
As a result, I will hopefully save you some time and frustration by giving you pointers on how to avoid edges that curl. So let’s get to it!
Reasons Edges Curl in Crochet
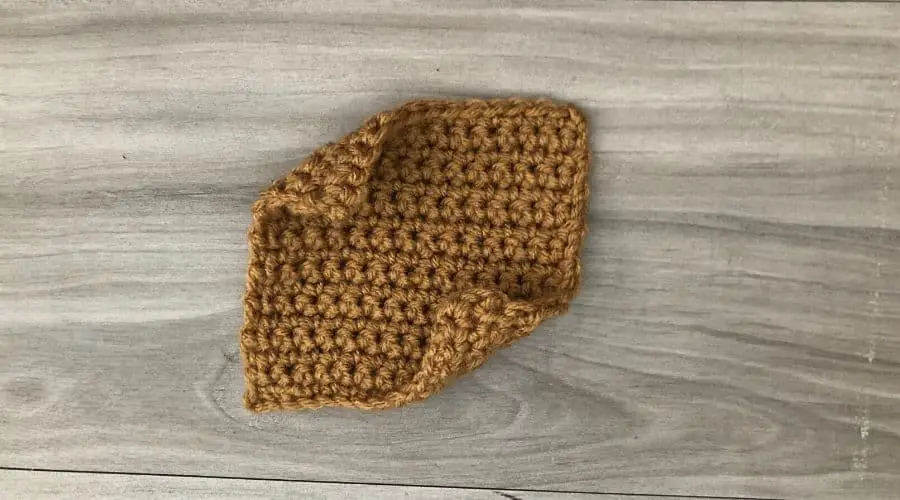
When you crochet and find that your corners or edges start curling, your project will no longer lay flat. Just look at that swatch, the corners curl up so badly. This is frustrating because it just doesn’t look right. You may find yourself tempted or forced to rip out the stitches and start completely over.
If you find yourself in this situation, please don’t rip out just yet. Let’s look at the reasons your crochet is curling. If you can determine the reason, then you can decide if it can be saved or must be started over.
1. Tension is too tight.
Tension is all about the way you hold the hook and the yarn. The stitches will either be loose or tight. If the tension gets too tight, there are a few things that can happen.
- The stitches pull on each other inward and cause the fabric to curl.
- The fabric gets stiff and causes the corners curl up.
2. The beginning chain is too tight.
The beginning chain, or what others may refer to as the foundation chain, is a continuous string of yarn that loops back on itself. It is the foundation for any project. This is good because chain stitches are super easy to make. However, the entire project can be off if the beginning chain is not made just right.
If the chain is too tight, you will run into similar problems as tension being too tight. The stitches built on the foundation chain will pull on each other to try to remain straight, but will eventually curl inwards because the stitches have no room to move. A tight foundation chain can also result in uneven beginning and ending edges, but that is a different topic for another day.
Realizing this reason for curling is essential because your entire project depends on it!
3. The stitches used have a natural tendency to curl.
Sometimes it’s nothing you are doing wrong. The stitches just naturally curl up along the corners or edges. This can be frustrating when you start out, because no matter what you try, the edges end up curling. If this is you, take a deep breath, let it out, and continue reading. I have the most common crochet stitches that naturally curl listed below.
- Single crochet (sc)
- Tunisian crochet knit stitch (tks)
- Tunisian simple stitch (tss)
4. The hook size is too small for the yarn.
The hook size in a pattern or on the yarn label are recommendations. Yarns are not created equally, even if they are in the same yarn weight category. There are ranges of thicknesses for each yarn weight, which means there are ranges of hook sizes you can use for each category. For more specific information on that, I created a page dedicated to yarn weights which you can find here.
One possibility of your edges curling, is the hook size you chose is too small. Of course, tension could be the issue too. But if you think your tension is consistent, and the edges still curl up, the hook could be the culprit.
5. There are not enough stitches in the row when crocheting in the round.
When you crochet in the round, you are crocheting in a circle. To make a circle, you must add stitches in the rows (increase) for the circle to grow bigger. Things can go awry if increasing is done incorrectly.
For certain projects, like hats, amigurumi parts and baskets, you want the sides to curl up to gain the shape you want. But for granny squares or coasters, you don’t want any curving. If you find this happening, not enough stitches are being added to your increase. The stitches pull on each other and won’t lay flat.
6. The yarn substitution is not compatible.
Patterns will suggest the yarn that was used by the designer. However, the crocheter is not limited to those yarn choices. As long as the same yarn weight is used or the pattern gauge is met, any yarn choice is plausible.
The yarn substitution can play a role in the yarn curling along the edges though. Say bulky weight yarn is substituted for DK weight yarn. The piece may not lay flat because the conversion of stitches doesn’t exactly match up to the original. In an attempt to match gauge, stitch count can get off and cause curling.
Signs You Should Start Over
You now know the reasons why crochet projects can curl along the edges. But let’s be honest, you found this post because you have already started a crochet project and the edges are curling. You need to know if you can correct the curling at the end or if you need to rip out the stitches and start over.
I get it, I mean, who wants to rip out their hard work and start over? I wish I could tell you it’s okay to cross your fingers and hope for the best. But the reality is, there is not always a magical way to fix the issue. Sometimes you have to start over if you want a specific look. Yikes!
If you’re at the point in your crochet project where you’re debating to start over or hoping you can correct the curl at the end, there are a few signs to look out for.
Sign #1 – Your hands are cramping.
This is never a good sign. No one enjoys crocheting if their hands hurt. This happens occasionally if you’re holding a really small hook and super thin yarn. I would say that is more normal because you’re clutching onto a small object, which you are probably not used to. But, if you’re hands are cramping or your knuckles turn white when you make stitches, you should start over. Your stitches are going to be way to tight and prone to curling edges.
Sign #2 – Your project crocheted in the round won’t lie flat.
If you are stretching stitches as you go or pressing your hand on top of the piece in an attempt to get your circle to lay flat, but it just won’t, it is probably time to throw in the towel. As I stated in the reasons above, your project could be lacking enough increase stitches to make it lay flat. The only way to correct the issue is by starting over.
Sign #3 – Your project is curling at the bottom where the project started and the rest of the project is growing wider.
It is never a good sign if the foundation chain is not the same width as the rest of the fabric. This means the chain stitches are too small and the project is prone to curling. Sometimes just the corners curl in, other times the whole bottom edge curls in. Either way, it will do you good to start your project over and correct the beginning chain stitches.
Sign #4 – The stitches spring back to their original position after you tug on the fabric to loosen the stitches.
As you go, it’s a good idea to stretch out the fabric if it begins to curl. This helps you determine whether or not the stitches will straighten out on their own. Unfortunately, if the stitches remain or go back to their original, curled position, it is a sign to start your project over. Your tension is off or you need a bigger hook.
Troubleshooting Edges that Curl After Project is Complete
So you know why your project is curling and signs to look out for to start over, but you have a project and you are way too far along to even think about ripping out and starting over. I feel ya.
Good news, there are a few options that I have highlighted for you to consider so that all the time you spent previously does not go to waste.
Block your project.
How blocking works. Blocking involves getting your project wet by water or steam. The moisture softens the fibers so that they can mold easier into the shape that you want. Pins are sometimes necessary to hold the project in place to help the shaping.
Once the fabric is completely dry, the pins can be removed (if used). This is when you see if your effort paid off. Hopefully those pesky curls have been erased through blocking.
When to consider blocking. If the edges of your project curl up just a little bit, blocking may do the trick to straighten them out. I wouldn’t do this if your edges have major curls. Blocking is magical, but it has its limits.
Tip: If the care instructions on the yarn label state you can wash and dry the fabric, go ahead and do just that. Then take out the project when it is still a little damp and let it dry flat. This can help to straighten out the curling edges in a little less time than normal blocking.
Add a border to your project.
How this works. Adding a border along the edges of the project can help weigh the fabric down, which in theory will flatten the edges. The right amount of stitches, especially around the corners, are necessary to make this solution work. Otherwise, the curling edges could be amplified.
For an example, I photographed what the swatch looked like before adding a border. You can see that the corners curled up badly. But the second photo is a picture of the same swatch, but with a border of slip stitches. The swatch lays much flatter afterwards.
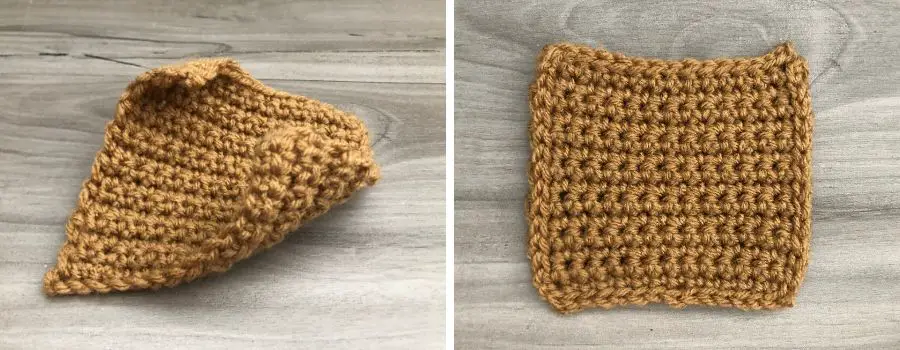
When to consider. Generally, this is best for blankets, scarves, or similar projects. A slip stitch border adds a more finished look along the sides and can help straighten out the curves (as pictured above on the right). Also, I’ve heard that a reverse single crochet stitch will take away the curl every time. Although, other stitch patterns will help weigh down the fabric and get rid of curling.
Put heavy books on top of your project.
How this works. Well, this is self-explanatory. If the edges of your project don’t lay completely flat, put a heavy book or two on top of it. Leave the books there for a little while then come back and check if the edges are flat. I’ve done this for circles that nearly lay flat, but still need a little help and it works most of the time.
When to consider. If your edges are almost, but not quite flat, this method can work. I would also consider this only when your projects are small enough to fit under a book. It’s not a cure-all, but can do the trick in a bind.
How to Prevent Curling on the Edges
When you are chugging along on a crochet project, but notice the edges curling, don’t ignore it. Yes, curling edges can go away by adding more stitches, which adds more weight to the fabric. Or, as we discussed in the previous section, some curls can be corrected after you finish.
BUT, that is not always the case. Recognizing the problem early will make it much easier to start over and fix the problem.
This section is for those that want to prevent curls from happening. Without further ado, here’s what you came for: the ways to prevent curling on the edges.
1. Make a gauge swatch.
Tension, tension, tension. The biggest cause for edges to curl is, you guessed it, tension. Making a gauge swatch (a sample of the project) allows you to test tension on a small scale. You can see if the yarn, hook and stitch combination have a tendency to curl.
The combination used below worked, kind of. The corners curl a little, but in the bigger project, the yarn may naturally correct itself. But I wouldn’t have known this without a gauge swatch.

Gauge is the most important step for many projects. If you need more information, I wrote an entire blog post on gauge and why we should even care about it. Find the article on the blog here!
If the swatch does curl, you can test out blocking, adding a border, or setting a heavy book on top, as I mentioned in a previous section. This way you can predict whether or not these things will happen, before committing to the entire project.
Making a gauge swatch just might be the key to help you prevent edges from curling.
2. Use a larger hook size.
A larger hook size creates bigger stitches and the fabric is looser and have more drape. The stitches have more room to move around and they won’t pull on each other inward.
A larger hook can also help with tension. You can crochet the same way, but yield better results because the gauge is bigger. Generally, looser stitches prevent curling from happening along the edges.
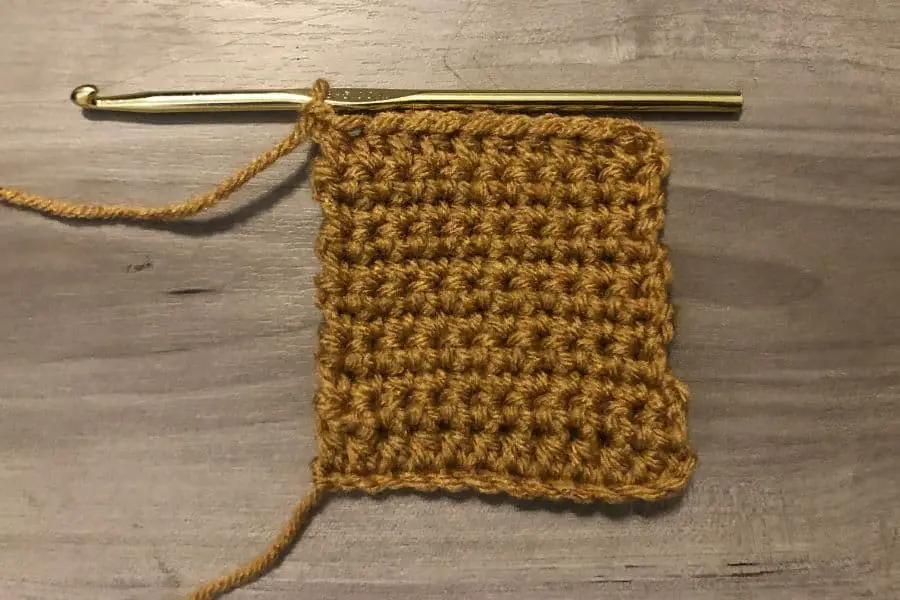
Pro Tip: Use a hook size larger than the pattern suggests to make the foundation chain. Then proceed with the suggested (smaller) hook size for the rest of the project. It’s hard to get the chain right, but with a larger hook, the stitches will naturally be bigger. This can solve the root of many problems for curling edges.
Just look at the photo below. I used a size larger for the beginning chain and went back to using the smaller hook for the rest of the swatch. In the photo on the left, I used the smaller sized hook for everything. A simple change can make the biggest difference.
3. Use stitches with more height.
I already discussed that some crochet stitches naturally curl inward, no matter what you try. So instead of strictly using that one stitch, for example single crochet, switch off rows with another stitch that has more height to it. This can help balance out the fabric.
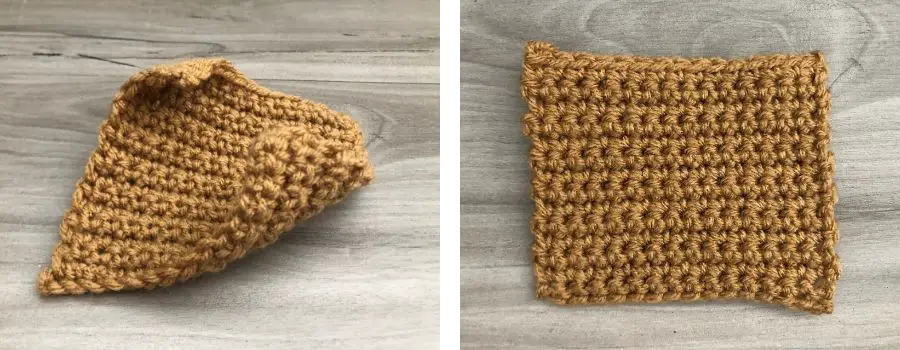
To show you an example, I have a snapshot of a swatch I created. The first row and the last row are made with half double crochet stitches, while the rows in between are single crochet stitches. The swatch already laid so much flatter than the previous one I made which is photographed above.
4. Add more stitches to the round.
Crocheting in the round starts with a small circle that grows bigger and bigger until it is the desired size. In order to make the circle bigger, stitches are added to each round, which are called increases. Sometimes the fabric does not want to lay flat, which could indicate you don’t have enough stitches in the round.
Sometimes we get going and inadvertently skip an increase, so count the stitches for each round to ensure the correct number of stitches is there. For example, look below to see what issue can arise from 1 stitch less. The top portion is starting to curl up.
If you have the correct number of stitches, but the fabric still isn’t laying flat try increasing a few more stitches per row. If you want guidance on how to make the perfect circle, check out the article Interweave published on their website here. They created the magical formula for the perfect circle.
You can also run into the same issue if stitches switch every other row while crocheting in the round. The stitch height of a double crochet is bigger than a single crochet but smaller than a treble crochet.
Say for instance, you crochet a row of double crochet then you switch to single crochet. You need to compensate for the height difference by adding more of the smaller stitches or skipping stitches with the bigger stitch. The double crochet stitches are bigger and more loose than single crochet stitches. So adding the same number of single crochet stitches on top of a row of double crochet can draw the fabric inward.
This also goes for granny squares. Sometimes the square wants to curl upwards, but you need it to lay flat to stitch together. Add more stitches to the corner of the granny square to make it lay flat. A good rule of thumb is to do 3 double crochet, chain 2, 3 double crochet in each corner. Or you can chain 1 stitch after each set of 3 double crochets to make it lay flat.
5. Start with a chainless foundation row.
A foundation chain is the long string of yarn loops you make at the beginning for any given project. But there is a method that incorporates the chain and first row of stitches into one, the chainless foundation row.
I found a video on YouTube to illustrate the method for a chainless foundation row that you can view below. In it, you can see how to make a foundation row for single, half double and double crochet stitches.
You should consider this method because the first row will be stretchy and eliminate the problem of the chains being too tight (a common problem for a traditional chain). Also, you save yourself a step by combining the chain and first row together.
6. Add a border for Tunisian crochet.
Have you ever seen a project or a swatch knit only in stockinette? The fabric curls badly. The same can happen with Tunisian crochet. Some stitches naturally have a bigger possibility of curling. But don’t worry, there are ways to combat this.
Adding ribbing or a small border in the beginning with the Tunisian seed stitch, double stitch, purl stitch or extended stitch can prevent the bottom from rolling up into a scroll. Or adding these stitches along the sides for a few stitches before crocheting the main stitch can also prevent curling along the edges.
The key is to add a small border around the main stitch that naturally curls to maintain balance for the project. The video linked below shows an example of what a border might look like for Tunisian crochet, but also many other tips for getting rid of the curl.
Conclusion
You can always cross your fingers and hope your project will straighten out on its own. However, I think the better approach is to understand why your project is curling and correct the issue. It is much better to prevent curling from happening from the beginning, that way you don’t have to heavily rely on blocking or add an extra step and hope the border cures the problem.
I hope you found this helpful! Let me know what you think. Happy crocheting!
Recent Posts
The Sole Hat: A Classic Knit-Look Hat Crochet Style | Free Pattern + Tutorial
If you're a crochet enthusiast looking for a timeless, cozy hat pattern with a unique twist, you're in the right place! Introducing Sole, the crochet version of the classic, chunky 2x1 knit ribbed...
Twofold is the Sew Homey take on a classic, chunky knit-ribbed hat with a folded brim. It features the same unique stitch combination and short rows as the Sole hat, but with a modification of stitch...