Summer time, the perfect time to be crocheting, contrary to popular belief. There are birthdays and baby showers to attend. The perfect opportunity to make a gift for a loved one.
Please continue reading for the inspiration behind the pattern and scroll down to follow the free instructions and picture tutorial to make your very own pachyderm lovey.
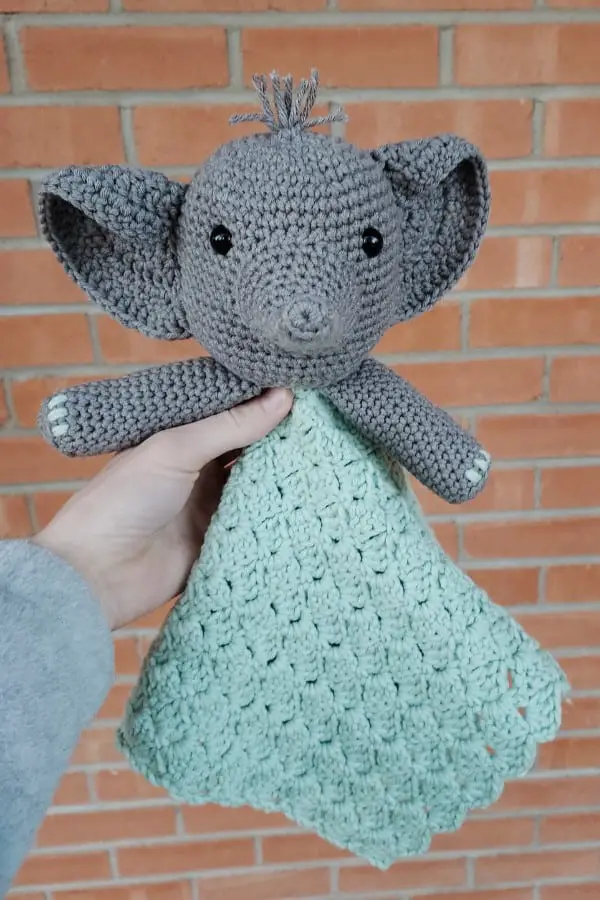
The Inspiration
One of my dear cousins is pregnant and expecting her firstborn son in July 2020. Of course, I couldn’t go to the baby shower without a handmade gift.
My cousin LOVES elephants. I wanted to make her an elephant lovey. The perfect combination of stuffed animal and security blanket. They are so adorable!
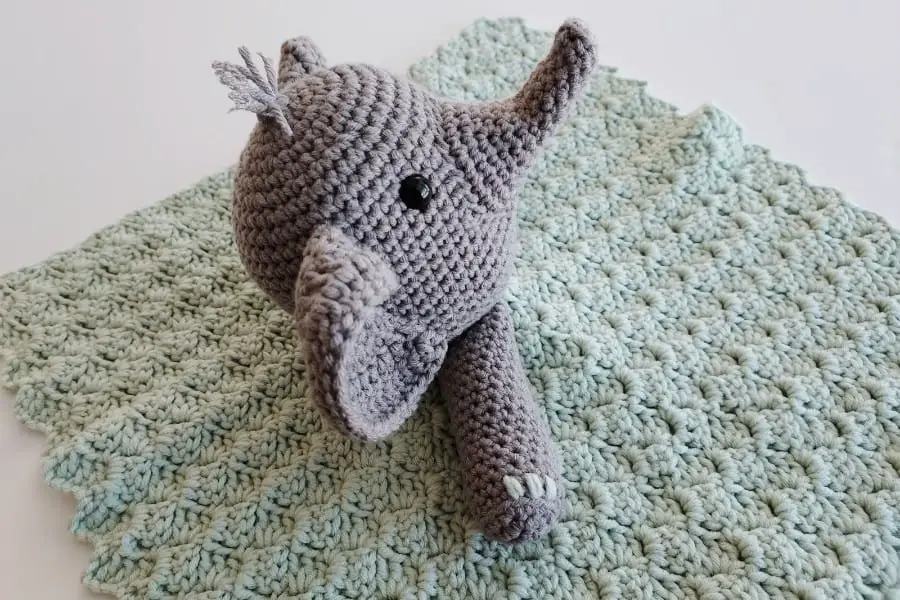
I found this great stitch pattern from the book Crochet Every Way Stitch Dictionary for the blanket portion. Since elephants have wrinkles, I wanted a texure that resembled wrinkles. I think that was achieved.
We had a surprise baby shower for her a couple of days ago and she was in love with it! I think she almost cried when she saw what it was. When I gave her a hug, she said it was definitely going to the hospital with her. That is why I do what I do. I make things that give joy to people.
I can’t wait until the babe is born. I’ll have to update this post with pictures of him (or his mom) cuddling it. For now, the only pictures I have are the ones I took at my house when I finished it. It is still pretty darn cute.
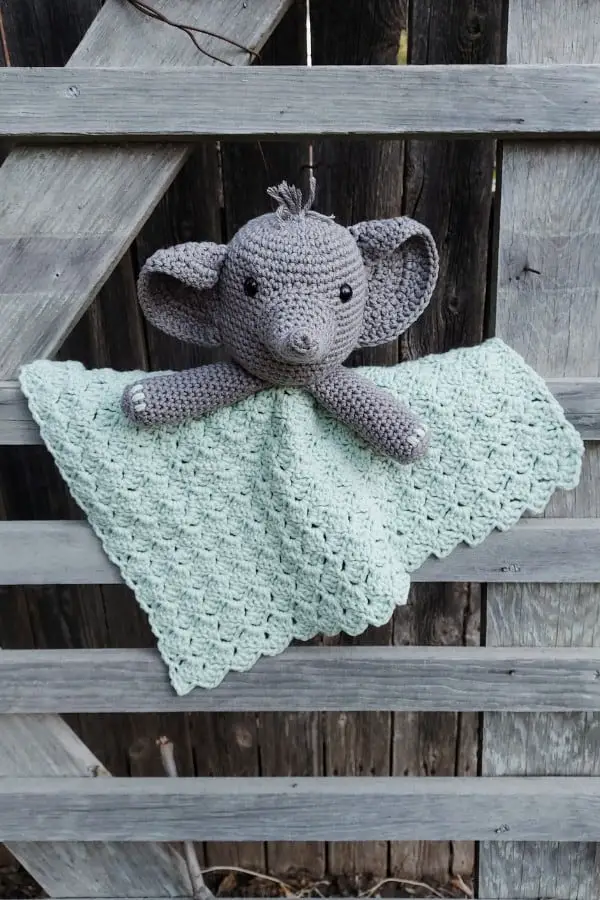
So, without further ado, I present to you, Pachy (pak-ee) the pachyderm. He is the sweetest crochet elephant lovey you will ever meet!
Learn more about my newest version of Pachy the Pachyderm in my latest podcast episode!
PATTERN
*This pattern has been updated to provide better shaping in the trunk and head of the elephant.
DESCRIPTION
Pachy (pak-ee) the pachyderm is the snuggliest, most adorable elephant lovey. Bring the biggest grin to your loved one’s face when they receive this gift, because it will be love at first sight. The soft elephant will endure a lifetime of love and cuddles.
The unique stitch pattern for the blanket resembles an elephant’s wrinkles, which is fun and easy to make. Enjoy crocheting your loved one’s new favorite friend that will last a lifetime!
MATERIALS
- Lion Brand Comfy Cotton Blend: Silver Lining (weight: 3/light, 7 oz, 392 yards – there will be some left over)
- Black yarn (any 3 weight yarn)
- White yarn (any 3 weight yarn)
- Size G / 6 / 4.00mm hook
- Tapestry needle
- Poly-fil stuffing
- Scissors
- Stitch markers
- Measuring tape or ruler
DIMENSIONS
*All measurements were taken after the lovey was washed and dried.
Blanket size: 11″ x 11″
Total height: 12.5″ (top of the head to the tip of the blanket)
Head width: 4″ (side to side, stuffed)
Head height: 4.5″ (top to bottom of the head, stuffed)
Arm length: 4″
Trunk length: 3.25″
Ear: 4″ (straight edge of half circle)
ABBREVIATIONS
ch – chain
st – stitch
sc – single crochet
dc – double crochet
blo – back loops only
inc – increase
dec – decrease
yo – yarn over
sk – skip
tch – turning chain
rep – repeat
SPECIAL STITCHES
inc – place 2 sc (or dc) in the next st
sc dec – insert hook in the st, pull up a loop (2 loops on hook), insert hook in the next st and pull up a loop (3 loops on hook), yo and pull through all 3 loops on hook
blo- insert hook into the back loop of the stitch only and make the stitch specified
SKILL LEVEL
Easy – project uses basic stitches, simple stitch patterns, and basic increases and decreases
NOTES
- The elephant size can be adjusted by using a different weight yarn and hook size. *Yardage will change.
- The blanket size can be adjusted. Each block will add approximately one more inch to the height and width. Add 7 more stitches to the foundation chain for the per inch you want to add to the blanket size. *More yarn will be needed to make it bigger. For example, chain a total of 113 stitches of worsted weight yarn to get about a 15″x15″ blanket (used for the mint green lovey in the photos).
- US terms used throughout.
- Work in continuous rounds (a spiral) for the head, arms and trunk.
- Pieces are worked separately and sewn together at the end.
- Numbers listed with () indicate the final stitch count.
- The final piece can be machine washed and dried. Do so according to the yarn label.
- At the end of this page, there are 3 videos to show you how to crochet back loops only (blo), make a magic circle, and how to sew amigurumi pieces together seamlessly.
GAUGE
*Measured after washed and dried.
Blanket: 7 stitches (1 block) x 1 row = 1″ of blocks
Head, arms, trunk: 10 rounds sc = 2″ diameter
Ears: 7 rounds sc = 3″ diameter
Pachy the Pachyderm Lovey
Security Blanket
ch 99
Row 1: 2 dc in 4th ch from hook (3 sk ch count as dc), *skip next 3 ch, sc in next ch**, ch 2, dc in next 3 ch, rep from * across, end last rep at **, turn.
Row 2: ch 3, 2 dc in first sc, *sk next 3 dc, sc in top of next ch-2, ch 2, 3 dc in same ch-2 space, rep from * across, sc in tch, turn.
Rows 3 – 30: rep Row 2
Fasten off and weave in both tails. Set aside.
Head
Make a magic circle
Rnd 1: 6 sc in the circle (6) [pull the circle closed]
Rnd 2: inc around (12)
Rnd 3: 1 sc, inc; rep around (18)
Rnd 4: inc, 2 sc; rep around (24)
Rnd 5: 2 sc, inc, *3 sc, inc; rep from * around, end with 1 sc (30)
Rnd 6: 4 sc, inc; rep around (36)
Rnd 7: inc, 5 sc; rep around (42)
Rnd 8: 2 sc, inc, *6 sc, inc; rep from * around, end with 4 sc (48)
Rnd 9 – Rnd 23: sc around (48)
Rnd 24: 4 sc, dec, *6 sc, inc; rep from * around, end with 2 sc (42)
Rnd 25: 5 sc, dec; rep around (36)
Rnd 26: dec, 4 sc; rep around (30)
Rnd 27: 1 sc, dec, *3 sc, dec; rep from * around, end with 2 sc (24)
Rnd 28: 2 sc, dec; rep around (18)
Begin adding stuffing to the inside of the head.
Rnd 29: dec, 1 sc; rep around (12)
Rnd 30: dec around (6)
Continue to add stuffing to the head, as much or as little as you like.
Fasten off, leaving a long yarn tail (approximately 20″ or so) for sewing. Weave in the magic circle end. Set aside.
Trunk
Make a magic circle
Rnd 1: 8 sc in the circle (8) [pull the circle closed]
Rnd 2: working BLO, sc around (8)
Rnd 3-5: sc around (8)
Rnd 6: 3 sc, inc; rep (10)
Rnd 7: sc around (10)
Rnd 8: 4 sc, inc; rep (12)
Rnd 9: sc around (12)
Rnd 10: 3 sc, inc; rep (15)
Rnd 11: sc around (15)
Rnd 12: sc around (15)
Rnd 13: 2 sc, inc; rep (20)
Rnd 14: 4 sc, inc; rep (24)
Fasten off, leaving a long yarn tail (approximately 10″ or so) for sewing. Weave in the magic circle end. Set aside.
Arms
*Make 2
Make a magic circle
Rnd 1: 6 sc in the circle (6) [pull the circle closed]
Rnd 2: inc across (12)
Rnd 3: 3 sc, inc; rep across (15)
Rnd 4: working blo, sc across (15)
Rnd 5 – 22: sc across (15)
Fasten off, leaving a long yarn tail (approximately 10″ or so) for sewing. Weave in the magic circle end. Set aside.
Ears
*Make 2
Make a magic circle
Rnd 1: 6 dc in the circle (6) [pull closed to half circle]
Rnd 2: ch 3 (counts as 1st dc), dc in first st, inc across (12)
Rnd 3: ch 3 (counts as 1st dc), sk first st and inc in second st, *1 dc, inc; rep from * across (18)
Rnd 4: ch 3 (counts as 1st dc), sk first st and dc, inc in 3rd st, *2 dc, inc; rep from * across (24)
Rnd 5: ch 3 (counts as 1st dc), sk first st and dc in next 2 sts, inc in 4th st, *3 dc, inc; rep from * across (30)
Fasten off, leaving a long yarn tail (approximately 10″ or so) for sewing. Weave in the magic circle end. Set aside.

ASSEMBLY
Sew the trunk to the head. Stuff both the head and the trunk with Poly-fil. Hold up the trunk to the head and determine the placement. My trunk was attached starting around rnd 15 down to rnd 21. Outline the trunk with stitch markers on the head. Sew the trunk, using the stitch markers as a guide, to the head.
In the picture below, the yellow stitch markers outlined where my trunk would go. I sewed inside the stitch markers.

Next, shape the ears. At this point, the ears are half circles. But we want to shape them so they are smaller and more elephant-like.
Fold the top of the ear (the end with the yarn tail) so the tip matches up with the center of the circle. Seam along the edge to keep the fold from coming undone. Leave the long yarn tail for sewing.
The piece on the right is what the ear looks like before the fold. The ear on the left is folded according to the directions above and looks exactly how you want it.

The same needs to be done for the second ear, but make sure the fold goes the opposite direction. The ears should be mirror images of each other like in the above picture.
Once the ears are shaped, sew them to the head. Find the placement for the ears on the head and mark with stitch markers. I tried to place mine on the side of the head, equidistant from the trunk.
Then I found it helpful to unstuff the head and flatten it out with the trunk in the center. Move the stitch markers (if needed) to the folded edge of the flat head. Make sure the ears will line up on both sides. The top of my ears were placed around rnd 7 and the bottom around rnd 22.
The picture below illustrates what I mean by flattening the head. The orange stitch markers are where the tops of the ears should go. They line up at the fold when the head is flat. And at the time, I did not have the trunk sewn on, but it would be where the yellow stitch markers are.

Next, stuff the head again and sew the ears to the head. Try to keep a straight line as you sew from top to bottom. Add more stitch markers to follow if necessary.
Sew the head to the blanket. First, find the center of the blanket. It’s easiest to do so by folding the blanket in half, then in half again. Place a stitch marker on the corner where the folds meet. Look at the picture below for guidance. Unfold the blanket.
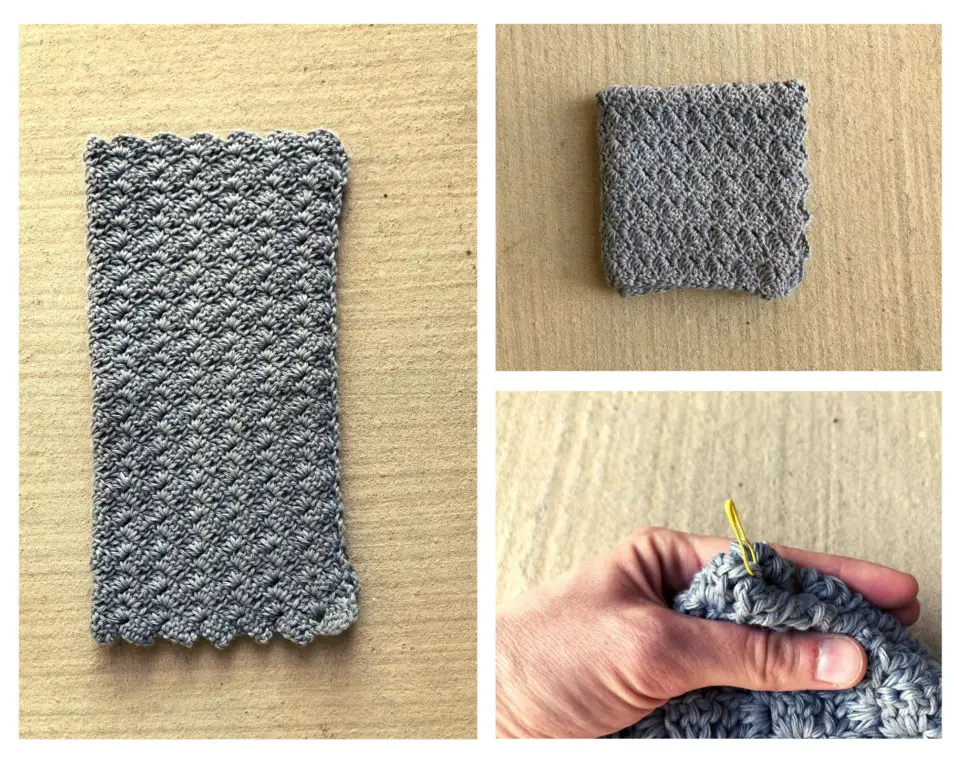
Measure the diameter of the bottom of the head (the open part). The diameter should be roughly 3 inches. Use this measurement to mark a circle with stitch markers around the center of the blanket (the yellow stitch marker).
Measure the diameter across the blanket horizontally and vertically, using the center stitch marker as the halfway point. Mark those two edges with stitch markers. Do the same thing for diagonals between the cross that was just made.
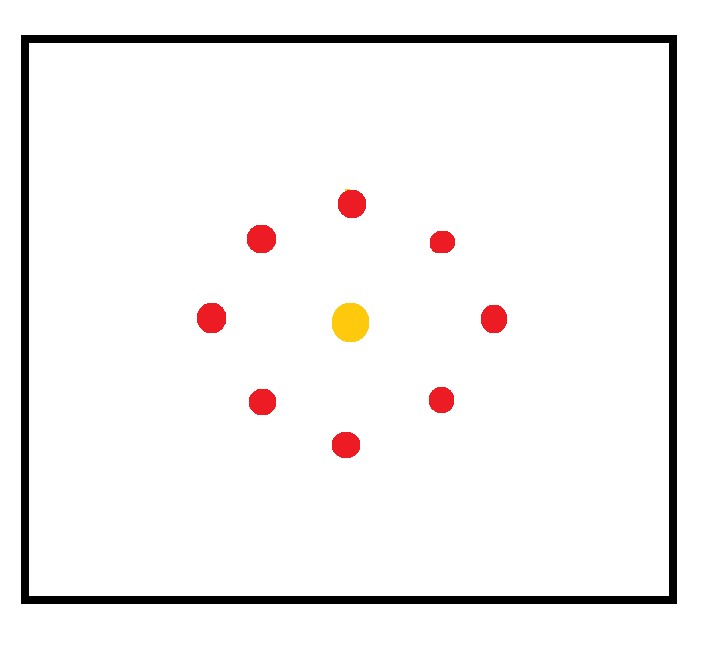
To help illustrate, refer to the picture below. The yellow dot is the stitch marker that marks the center of the blanket. The red dots are stitch markers that make a circle where the head should be sewn.
From the yellow dot to each red dot, the distance is 1.5 inches, which means the distance from each red dot (with the yellow in the middle) is 3 inches, our diameter.
Use the red dots as a guide for sewing the head onto the blanket in a perfect circle.
Start sewing the head from the long yarn tail you left. When you make stitches on the back side, hide the yarn tail through the back loops to keep both sides looking good.
Sew the blanket stitches closed where the head is attached. The stuffing is at risk of coming out of the head since the blanket has gaps in the stitches. To prevent that from happening, use the same yarn tail you used to attach the head to the blanket and sew the gaps of the blanket together. Make sure to only do this for the stitches where the head is.
Weave in the yarn tail and trim the excess yarn.
Sew the arms to the blanket. First, stuff the arms. Then sew the circles closed. Hold the two sides of the circle together and seam along the edge. Keep the long yarn tail for sewing.
The arm on the left is what the arm on the right should look like after seaming the edges together.

Hold up the arms to the head and mark where you want them to be sewn. I placed mine more to the front instead of directly on the sides. Sew them to the side of the head and the blanket.

EMBELLISHMENTS
Adding the eyes, toe nails and tuft of hair is the perfect way to liven up your elephant. Pachy will look much more loveable and cuddly with these embelishments. It will take just a few more minutes to complete your lovey.
Eyes
Draw an imaginary line up from the right and left side of the nose. Go up as far as you want. This is the beginning stitch for the eyes. I went up approximately 4 rows from the top of the trunk, which is about rnd 12 on the head.
For the right eye, sew a straight line, left to right, over 3 stitches with the black yarn. From the right edge, sew a diagonal line over 2 rows that slants to the right.
Do the same for the left eye, but a mirror image. It gives a closed eye look, like pictured above.
It gives a closed eye look. Here is a close up to show what I did.
To secure the eyes in place, pull the ends of yarn through the same hole. Tie a couple knots together. Then use the tapestry needle and pull the two ends back into the head, hiding the knots inside.
You can also add safety eyes, which is what I did for the second Pachy that I made. Place them evenly apart, then secure them to the face of the elephant. Below illustrates what this looks like.
Toes
With white yarn, sew from the edge of the arm (above the BLO round) and sew over one row of stitches. Then skip a stitch and do the same thing. Repeat for a third toe nail. I traced over the toes twice to make them stand out more.
Tie knots and pull them inside the arm in the same manner as the eyes.
Hair
With the gray yarn you used for the elephent, cut 5 3-inch pieces of yarn. More strips will give more hair.
At the top of the head, put your crochet hook through a stitch and pull up the scrap yarn and tie it to the top of the head. Repeat for each piece of yarn you cut. See the picture for guidance.

Next, unravel the yarn into the smaller strands. You can comb them with your fingers to give a finer hair texture.
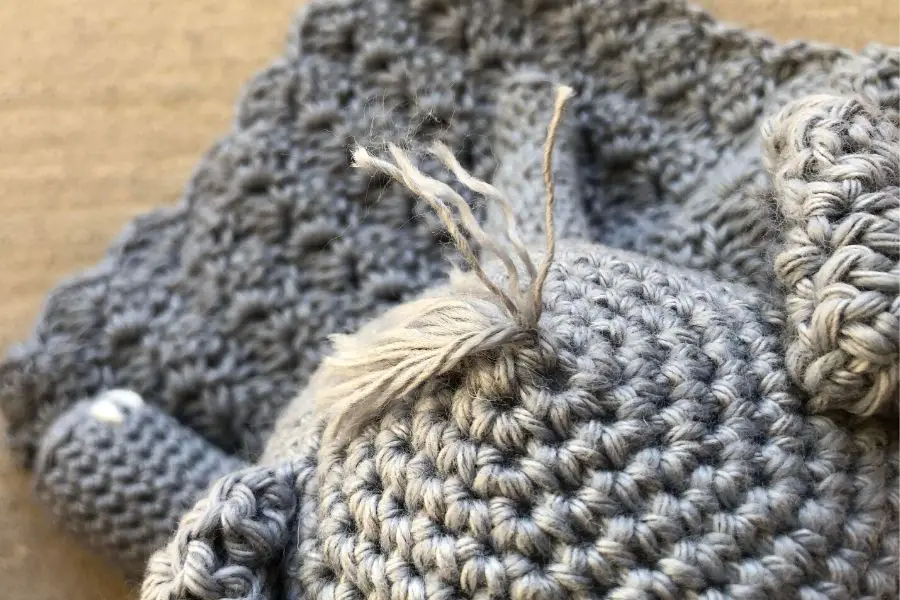
Finally, cut the hair to the preferred length.
Helpful Videos
This section provides helpful videos to illustrate the techniques used in this pattern.
Seamless Join for Amigurumi Parts
This video shows an easy way to attach pieces of amigurumi together with a seamless join. You won’t see the stitches after they have been made.
How to Make a Magic Circle
The magic circle is a technique to start the first row of a round. The circle will close all the way, no holes, for the head, ears and arms.
Back Loops Only (BLO) Stitch How To
This is a technique is a normal stitch, but worked through the back loop only, as the name suggests. It gives a unique texture that is used for the arms in the pattern above. It creates a nice line that gives the arm a flat looking bottom.
As always, I hope you enjoyed this pattern and that you will make it for a loved one. When you complete Pachy the Elephant, tag me in your photos on Instagram @sew.homey! I want to see them!!
Until next time, happy crocheting!
Recent Posts
The Sole Hat: A Classic Knit-Look Hat Crochet Style | Free Pattern + Tutorial
If you're a crochet enthusiast looking for a timeless, cozy hat pattern with a unique twist, you're in the right place! Introducing Sole, the crochet version of the classic, chunky 2x1 knit ribbed...
Twofold is the Sew Homey take on a classic, chunky knit-ribbed hat with a folded brim. It features the same unique stitch combination and short rows as the Sole hat, but with a modification of stitch...
