
My aunt asked me to crochet a teddy bear for her coworker’s baby shower. I jumped at the opportunity and immediately looked for a pattern.
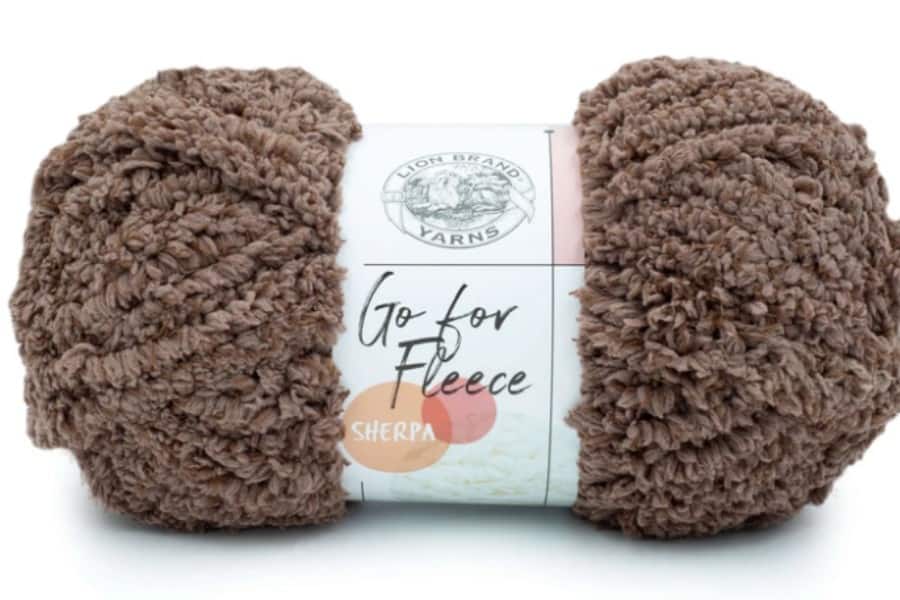
The Fleece Teddy and Bunny is a crochet pattern made with jumbo sized sherpa fleece yarn and results in an 18″ tall stuffed animal. This pattern was designed by Stephanie from All About Ami.
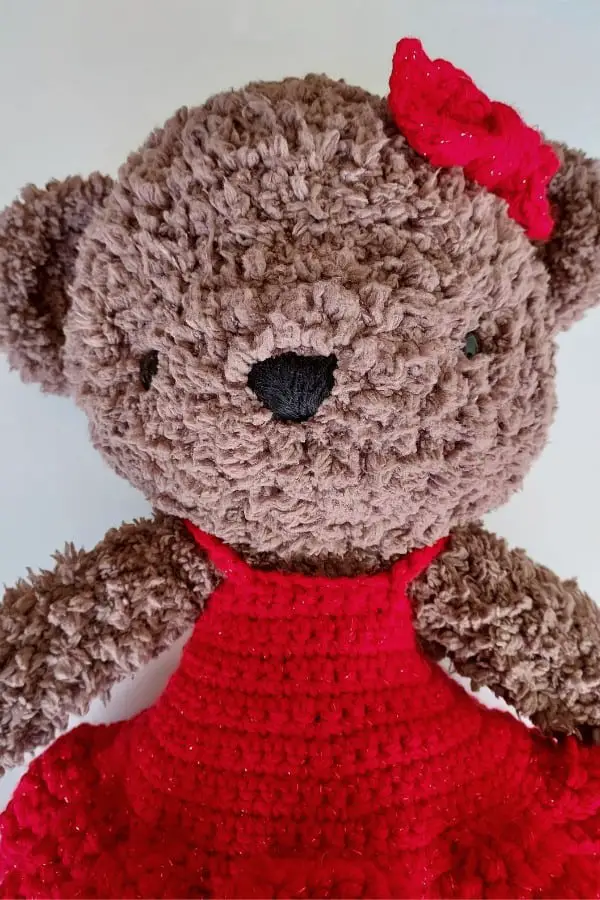
I was intrigued by this particular pattern because it does not look like crochet. The fuzzy yarn blends all of the stitches together and looks like a stuffed bear (or bunny if you choose) you would find at the store. It is so adorable and loveable! I’m happy with the results and I wanted to share my thoughts on the pattern.
I have also added a pattern for the dress that I used to crochet for my bear. It was something I made up along the way and I think it turned out really cute, so I wanted to share it with you here!
The Yarn is Difficult to Work With
This pattern uses the Lion Brand Go For Fleece Sherpa yarn, which is a #7 or jumbo weight yarn. It is super thick! And very soft. The recommended 2 skeins was just enough for the bear. I was actually scared I would run out of yarn when I got to the last arm, but I did have enough. I did not end up with any useable leftovers, which honestly is a good thing for me, I don’t know what I would use it for.
The pattern states right off the bat that if you are a beginner to crochet, this pattern is not recommended for you. I would have to agree! The fluffy yarn makes it impossible to see stitches, so if you are not careful to count the stitches, you will not achieve the same results. I started the head over twice because my stitch count got off.
Also, this type of fluff is sticky, not slippery. The stitches stick together, making it hard to keep an even tension. I even found the magic circle round (first round) to be tough because the yarn stuck as I tried to pull the hole shut. My recommendation is to pull slowly and guide the stitches to close up. If you pull too hard, the yarn will snap, trust me I speak from experience.
The most helpful piece of information to read over before starting the pattern is the section “fluffy yarn tips.” I 100% agree with everything she mentions there. I used stitch markers for EVERY round. This is helpful because if your count gets off, you can rip back to the marker and start over easily. Feeling for stitches is also super important (basically you feel for gaps) so your stitch count remains accurate. Finally, tallying the number of rounds as you go will ensure you don’t lose count.
When I was crocheting with this yarn, I started getting pain in my wrist. That’s the first time that has ever happened to me and I’ve been crocheting for over 10 years! I have had hand cramps from crocheting a ton at once, but never wrist pain. I think the bulky yarn and the way it sticks together made me overwork my wrist. I was also working on a few other projects at the time, so the teddy bear might not have been the only cause. But be careful, if you feel your hand or wrist getting tired, make sure to take breaks, you don’t want a lasting injury.
As I’ve described, the fluffiness of the yarn makes it difficult to work with if you are inexperienced. I don’t want to discourage anyone from crocheting this pattern, just know that it might take you longer to figure out.
The Written Pattern is Easy to Follow
The pattern is beautifully written. Each round is clear and there are pictures when useful. The crocheting portion was easy (not taking into account the yarn). Simple stitches, increases and decreases were used. Each section is broken down into parts, so it was very easy to follow.
This pattern uses several shaping techniques, which is how you level up your crochet stuffed animal. The shaping techniques mainly took place on the head. You pull the eyes in to make indentations and pull yarn over the nose to create the snout. It’s a very clever way to really make the bear look like a bear. I did have trouble getting the placement of the shaping on the legs just right. I tried to get them as even as possible.
This was my first experience with shaping a crochet stuffed animal face. The pattern has many diagrams and exact measurements for when and where to do certain things, which is so helpful. But I did find it a little difficult to get the measurements exact. I put stitch markers at the desired spots to mark the dimensions, but they would move in the fluffy yarn. I was still able to get results I liked, it just took a few attempts to get what I wanted.
After the head comes the body and the legs. The legs and body are attached in a really neat way. I had never seen the technique she uses. Take a look at how it all comes together and becomes the body in one piece. She makes it easy to follow with her pictures and diagrams.
Finally, the assembly of the bear is straightforward. You sew the different parts to the designated areas on the bear. When I attached the head to the body, I noticed the head flopped around a lot. I did my best to stabilize the head by sewing around the body and head more.
The Teddy Bear is Achievable
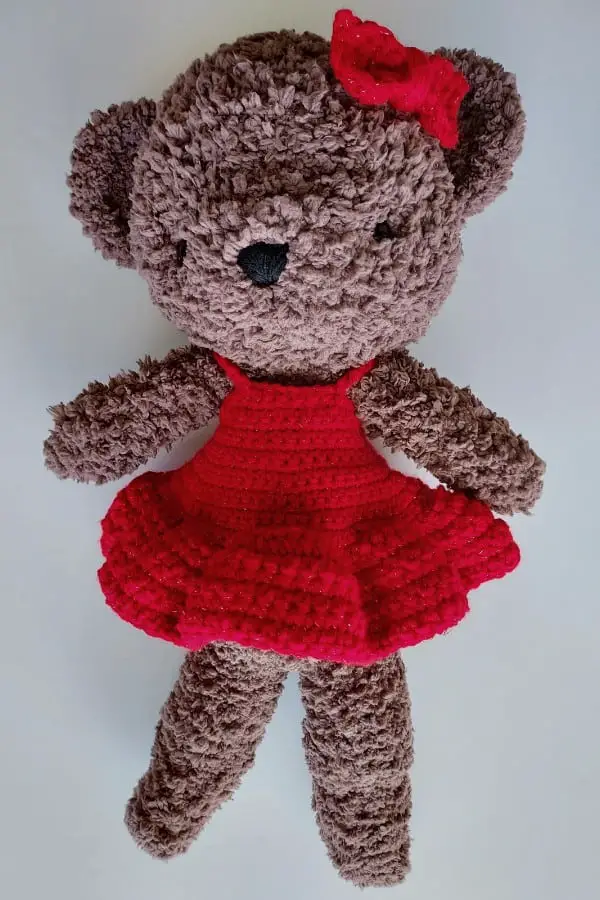
The photos prove that The Fleece Teddy and Bunny pattern is totally doable! I got a super adorable bear from following the pattern. It is ginormous, 18″ tall is massive. Mine did come out with those dimensions. For some reason I think my head ended up bigger than the one in her picture… and I think mine looks more like a koala bear… but that is totally my doing, not her pattern.
The minute details like embroidering the nose, sewing on the ears, and sewing on the arms are not my strongsuit. I enjoy the process of crocheting the pieces and admiring what it will look like, but I have a hard time getting the parts to look exactly as I want. For some reason I don’t always have patience with this. I did try my hardest and started over several times so I could get it just right since I will be gifting mine.
All in all, I am pleased with the results! This pattern was so fun, easy to follow, but difficult to use the yarn. I do recommend you try out this pattern if you are feeling adventurous! I’m overjoyed that some adorable little girl will get to snuggle with the one I made.
Teddy Bear Dress Crochet Pattern
My aunt requested that I make a dress for the bear since her coworker has another daughter that is into dance. I loved the idea, it sounded really cute, and I had seen a few adorable ideas. I ultimately decided to go rogue and make up my own dress pattern as I went.
I have jotted down the simple pattern if you are interested. This was designed to fit this particular bear, so it will need modifications if used with another sized bear.
Crochet Dress Pattern for Fleece Bear
Begin: ch 36
Row 1: sc in back bumps across, ch 1, turn (36)
Row 2: sc across, ch 1, turn (36)
Row 3: *8 sc, inc, rep from * 3 times, sc in last 9 sts, ch 1, turn (39)
Row 4-5: sc across, ch 1, turn (39)
Row 6: *7 sc, inc, rep from * 4 times, sc in last 7 sts, ch 1, turn (43)
Row 7: sc across, ch 1, turn (43)
Row 8: 4 sc, inc, rep from * 8 times, sc in last 2 sts, ch 1, turn (51)
Row 9: sc across (51)
Row 10: *7 sc, inc, rep from * 6 times, sc in last 2 sts (57)
Row 11: sc across (57)
Row 12: * 8 sc, inc, rep from * 5 times, sc in last 11 sts (62)
Row 13-16: sc across (62)
Now hold 2 strands of yarn together to create a thick skirt
Row 17: inc in every st across, except for last 2 sts, see note below (120)
Row 18-23: sc across, ch 1, turn (120)
Fasten off + weave in ends
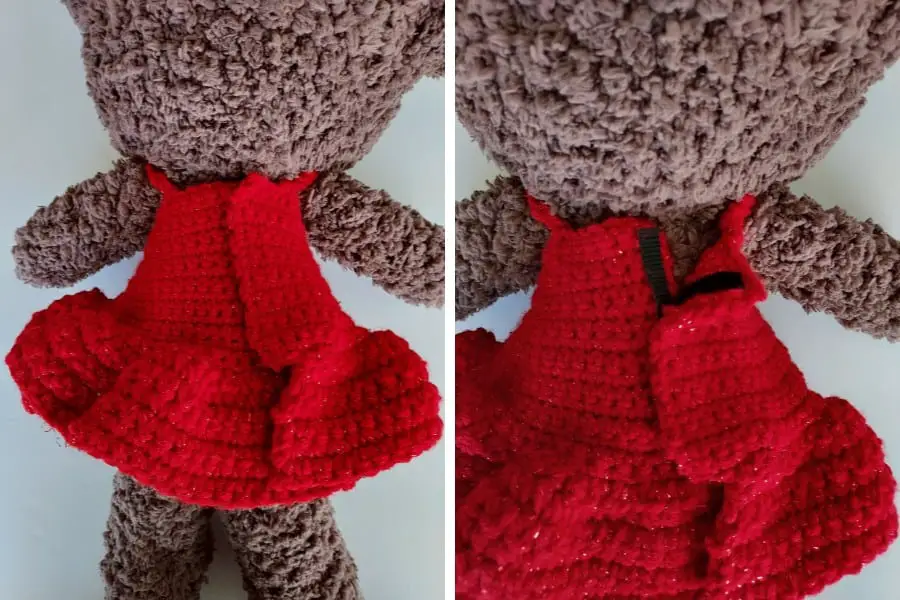
NOTE: the last 2 sts of the skirt remain unworked because when the dress fastens shut around the bear, the skirt overlaps. Leaving 2 sts unworked maintains a less bulky back.
Straps:
Begin counting from the side that has 2 unworked stitches at the skirt. Attach yarn into 5th st at the top of the dress, ch 12, skip 7 sts, sc into 8th st. Fasten off and weave in the ends. For the second strap, skip 5 sts, attach yarn to the 6th st from first strap, ch 12, skip 7 sts, sc into 8th st.
Fasten the dress together:
At this point, the dress is in one big piece with the straps attached to the top. To secure the back of the dress together, use adhesive velcro, cut a slender piece and attach to both sides of the fabric as the photo suggests. Now the dress will close and fit nicely on the cute bear.
Crochet Bow Pattern
Hold 2 strands of yarn together to create a nice, thick bow.
Begin: ch 5
Row 1: sc in bumps across, ch 1, turn (5)
Row 2-6: hdc across, ch 1, turn (5)
Row 7: sc across (5)
Weave in ends
Wrap yarn around the center + tie off
Sew onto the bear
Recent Posts
The Sole Hat: A Classic Knit-Look Hat Crochet Style | Free Pattern + Tutorial
If you're a crochet enthusiast looking for a timeless, cozy hat pattern with a unique twist, you're in the right place! Introducing Sole, the crochet version of the classic, chunky 2x1 knit ribbed...
Twofold is the Sew Homey take on a classic, chunky knit-ribbed hat with a folded brim. It features the same unique stitch combination and short rows as the Sole hat, but with a modification of stitch...