Completing the last row of a crochet project is satisfying and exciting. You can’t help but want to use the item right away. But what about those pesky ends?
Cutting them short is not an option if you want your project to last a long time. But you can’t leave them hanging there either.
The last step, and most tedious to many, is weaving in the ends. For those unfamiliar with the term, weaving the ends is a finishing technique used by crocheters to hide the yarn tails where you started and stopped the project. It also keeps your project from unraveling in the future.
The following methods are the most popular and trustworthy ways to weave in the ends to your crochet projects. I have tested them all and use them frequently so I added a few tips to help you even more. All you need is a tapestry needle and your finished project.
Method #1: Weave the Tail through the Finished Stitches
I would say this is the most common method of weaving in yarn tails. It is very simple too. Follow along for a simple tutorial.
1. Turn your project over to the wrong side, unless it is reversible, in which case the side you use won’t matter.
2. Thread your tapestry needle with the yarn tail.
3. Take the needle and go through the middle of the stitches for a few inches on the row the tail is coming from and pull the yarn through. Take a look at the photo below for guidance. Red yarn was used so you can see what I am talking about.
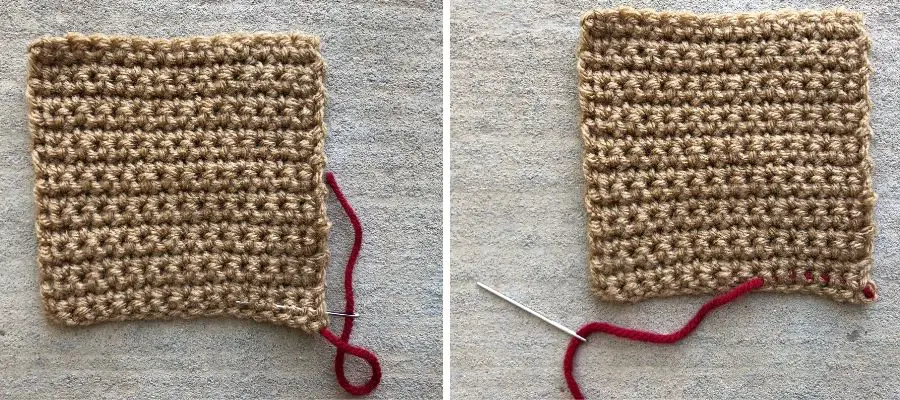
4. Take the needle and go back the opposite direction in the same row. Be sure to skip the first stitch so you don’t pull out what you just did. There is a photo below that illustrates.
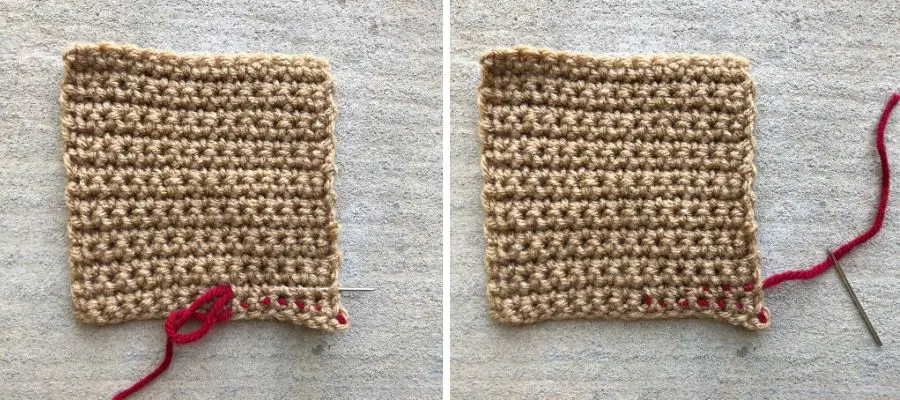
5. Go back a third time if the row will not become too bulky.
6. Pull the yarn a little to make it taut.
7. Snip the excess yarn.
8. Gently pull the fabric back into its shape to hide the tail well.
Why to Use This Method
- The tools needed to accomplish this method are minimal. All you need is a completed project, a tapestry needle, and scissors.
- The back and forth weaving keeps the yarn from slipping out of the rows and becoming exposed.
- This method of weaving in the ends can be used on any project.
- You won’t be able to tell where the yarn tails are at all once concealed, from either side.
- The chances of your fabric unraveling are slim to none.
Insider Tips
- Leave enough yarn at the ends. I suggest leaving about 4 inches or more to give enough of a tail to weave in.
- Split the yarn with your needle on the way through the stitches. The fibers will stick together better and won’t come out as easily. Do this especially with slick fibers.
- Go back and forth on more than one row. What I like to do is complete steps 3 and 4 then move up to another row and repeat the two steps again. I like to do this so that if the yarn comes out eventually, I have enough to snip off.
- If you have more than one color of yarn in your project, it is best practice to weave the yarn tail into the same colored stitches.
Method #2: Weave the Tail as you Crochet
Another method that is super simple to hide those ends. This is great if you don’t want many ends to weave in at the end.
When you crochet, you have a yarn tail. It comes from the beginning of a skein, adding a new skein or from the end when you cut away from the skein. This method takes that yarn tail and you pretend it isn’t there and crochet right over it, hiding it as you make progress on your project.
- Take the loose end of yarn and place it on top of the working row.
- Crochet normally, keeping the tail along the top as you go.
- Snip the excess yarn.
- *Optional: Keep a couple inches of yarn when you snip. Then take the end and weave it through the opposite direction.
This simple video shows how to weave in the ends as you go.
Why to Use This Method
- Not many tools are needed: a tapestry needle, finished crochet project and scissors.
- There are much less ends to weave in at the end, especially if you have a large project where multiple skeins were added.
- The ends will be concealed inside the stitches so there is a fat chance that your project will unravel.
- The ends will not show from either side of the fabric.
- You can use this method for any project.
Insider Tips
- Don’t do this with super bulky yarns. The rows may get too big and puff out in the place you crocheted over the yarn tail. Test this method out if you’re not sure if your yarn is too bulky.
- The last step is *Optional because I have actually never done this. Many other blogs online recommend this though. I, however, have always crocheted over my ends and never had a problem with it.
- If you change colors in your project, it is usually best to crochet over the same colored tail. However, the YouTube video at the beginning of the section shows how to weave the ends as you crochet with two different yarn colors, and you can’t even tell.
Method #3: Weave the Tail with a Whipstitch
This method is similar to method #1 except for one thing. You use the whipstitch instead of going through middle of the stitches.
- Turn your project over to the wrong side.
- Thread your tapestry needle with the yarn tail.
- Use your needle and make the whip stitch across a few inches.
- Reverse and go back the other way with the whip stitch.
- Snip the excess yarn.
For a refresher or a how to, I found a good video by Wolf and the Gang that illustrates the whip stitch. Just keep in mind they are attaching two pieces of fabric together. You will use the whip stitch on a single piece of fabric to secure the yarn end on the back side of the fabric.
Why to Use This Method
- The tools required are a pair of scissors, a finished crochet project, and a tapestry needle.
- The whipstitch weaves the yarn in and out of stitches in a way that will keep it from undoing.
Insider Tips
- Leave a tail longer than 4 inches.
- Use this method for projects that are not reversible.
- This works best for projects where the fabric and yarn tail are the same color. It will be concealed more.
- If there is any colorwork, whip stitch the yarn ends to the same color on the fabric.
Method #4: Unravel the Ends and Weave in Separately
This is a very effective method for hiding the yarn tails and keeping items from unraveling. But it does take time. Essentially you are weaving in two times more yarn tails than previous methods.
- Flip your project over to the wrong side, if applicable.
- Grab a yarn tail.
- Unravel the strands of fibers.
- Thread one or two of the strands together.
- Weave in the yarn by inserting the needle into the middle of a row of stitches.
- Repeat step 5 in the opposite direction.
- Snip the excess yarn.
- Continue steps 4-7 for each strand of the yarn tail and change the direction or row for each.
- Repeat steps 2-8 for every yarn tail.
I found an awesome video on YouTube that shows this method. Fast forward to 2:37 to get the full tutorial on how to do Method #4.
Why to Use This Method
- Many bulky yarns will be too fat to use any of the previous methods. By separating the strands out, the mini tails to weave in are a more manageable size.
- Your project will be extra secure because of the multiple strands and directions the yarn tail is woven.
- You only need a yarn needle, scissors and a finished crochet project.
Insider Tips
- Pair unraveled strands together to make stronger and easier to carry through the yarn.
- For a 4-ply yarn, unravel the tail in half, two plies for each end to weave in.
- Keep the yarn tail woven into the stitches that have the same color. This goes for any project that deals with many different colors.
Method #5: Weave the Tail by Seaming Together the Pieces of Fabric
Honestly, I don’t know if I am the only one that does this. Maybe there are others out there, I just haven’t found them yet. But, I actually used this technique to finish a cardigan I made recently.
I was getting impatient and lazy toward the end of the project and I did not want 50 million little ends to weave in. By using the yarn tails to seam the sleeves and shoulders together, I felt more efficient. I combined the seaming with method #1. Let me explain what I did.
1. Cut an extra long tail that far exceeds the recommended length of 4 inches. It should probably be longer than the side you are seaming together.
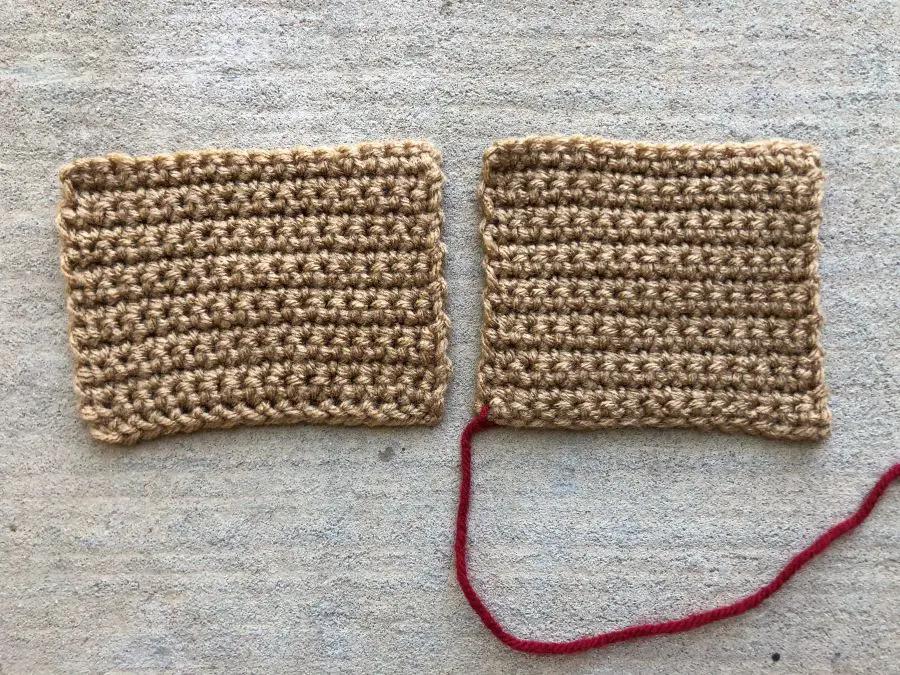
2. Thread the tapestry needle.
3. Sew the pieces of fabric together using the long yarn tail. A popular stitch to use for seaming is the mattress stitch, which works well for garments.
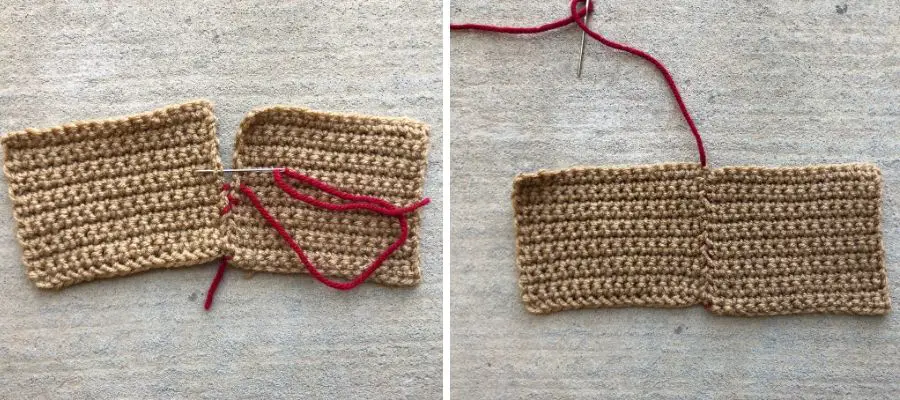
4. Tie a small knot. The knot is to keep the whole seam from unraveling if the end comes out somehow.
5. Use method #1 to finish the piece off.
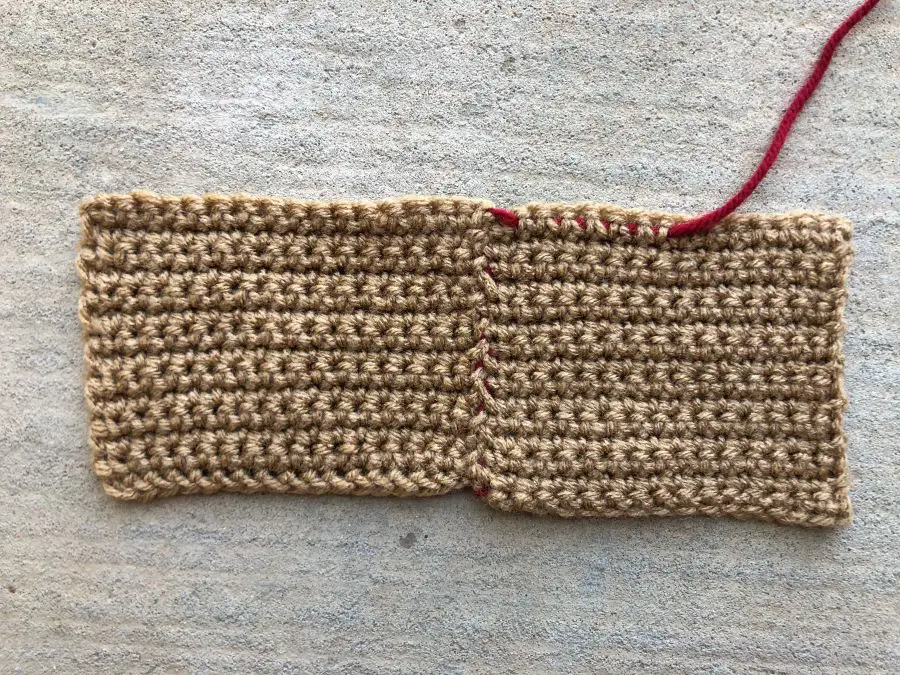
6. Snip the tail.
Why to Use This Method
- The ends that get woven in are extra secure because of the back and forth from the seaming stitches.
- More efficient because you seam as you weave in the ends.
- Your fabric has a low chance of coming undone.
- You don’t need much to complete. Just a pair of scissors, your project and a tapestry needle.
- This method of weaving in the ends can be used on projects with multiple parts that need to be attached, such as garments and amigurumi.
- The yarn tail will be hidden inside the seam and you won’t know where it is once it’s concealed.
Insider Tips
- You have to use another method, 1,3, or 4, to finish.
- I like to use another yarn tail to tie together for the knot. Then weave them both in.
- Use this method for sewing amigurumi parts together. The seams will stay intact, the pieces will be secure, and you won’t have to do any weaving in of the ends.
- The yarn tail must be the same color as the fabric you are seaming. This goes for projects that have multiple colors. Otherwise, you risk seeing the seam stitches through the fabric if it is a different color.
When Do You Weave in the Ends?
Yarn tails are woven in at the end of the project before blocking. Weaving the ends in before blocking will make them stay more secure. The fibers will adhere to each other from the water and stretching of the fabric. The yarn end will also relax more from the blocking. So if you pulled it too tight initially, it will loosen up.
It is also recommended to weave in your ends before seaming. I, however, never adhere to this. I like to use Method #5 and then weave in my ends, especially for garments. I like to ensure the fit is good before I go into all the work to weave in the ends.
What do I do if an End Comes Out?
The whole point of going through all the trouble of weaving in the ends is so you don’t have to redo all your hard work. You want your ends to stay hidden inside the fabric. But what if those ends come out?
First, you could try threading a tapestry needle and complete another round of weaving in the end using your method of choice. This only works if the tail that comes out is long enough though.
Another way to fix the spot where the end came out requires a special needle. I found this one on Amazon and if you are interested in what it looks like, click here to find the Clover Snag Repair needles.
The set comes with two needles, but you will want to use the bigger needle that is for looser woven and knit fabrics. The needle looks different because instead of an eye at the top, there are ridges.
To use the needle, you wind the yarn (or thread) around the top while twisting the needle at the same time. The fibers should adhere to the needle. Then you pull the needle, that is gripping the yarn, through the fabric to conceal the end again.
Don’t fret too much if an end peeps out. It’s not uncommon for it to happen over time. Resist the urge to snip the end when you see it come out.
Recommended Tapestry Needles
There are three main types of tapestry needles you can find at craft stores or online.
- Steel needle. Check out this one on Amazon.
- Steel needle with a bent tip. My favorite pack from Amazon.
- Plastic needle. Amazon has a great selection of these.
Each of these needles have a blunt tip so you won’t poke yourself when using it. Also, the eye of a tapestry needle is large so that many yarn weights can fit through them.
Plastic needles are great for kids that are learning to crochet. They are harmless, inexpensive and usually come in a multi-pack.
I prefer to use a steel needle, straight or bent. I think they glide through the yarn more easily, and they hold up better. For all projects, a straight steel needle is perfect for weaving in the ends. The bent tip needles are even better if you need to see what stitches you are picking up. This is especially beneficial with amigurumi.
For more suggested crochet supplies, please visit my Recommended Products Page.
Recent Posts
The Sole Hat: A Classic Knit-Look Hat Crochet Style | Free Pattern + Tutorial
If you're a crochet enthusiast looking for a timeless, cozy hat pattern with a unique twist, you're in the right place! Introducing Sole, the crochet version of the classic, chunky 2x1 knit ribbed...
Twofold is the Sew Homey take on a classic, chunky knit-ribbed hat with a folded brim. It features the same unique stitch combination and short rows as the Sole hat, but with a modification of stitch...
