
When I learned to knit, the first project I took on was a sweater (I never do things easily). Ribbing was the hardest part for me because I could not identify the difference between the knit stitches and the purl stitches. It wasn’t until the next row that I knew I messed up, but by that point it was too late. When I finally realized I made the wrong stitch, I had to rip out and start over.
The knit and purl stitches are created differently and have distinct looks. Knit stitches are made with the yarn held behind the needles and look like v’s when knit up. Purl stitches are made with the yarn held in front of the needles which creates a horizontal ridge across the bottom of the stitch.
Knitting is simple. All you need to know are the knit and purl stitches. That’s it, everything else is a combination of those two.
However, what makes knitting difficult and why people give up, is because they (me included when I began) don’t know how to “read” their stitches. Taking time to study the look of stitches on and off the needles is super beneficial.
I created this simple guide to help when you start your knitting journey. Let me walk you through identifying the difference between a knit stitch and purl stitch. And I urge you to grab a set of needles and some yarn so you can join me and get some practice!
The Knit Stitch
Let’s get started with the knit stitch. This is the most basic stitch out there for knitting. Everyone must know this stitch and often it’s the first stitch learned. Let me quickly walk you through how to do it.
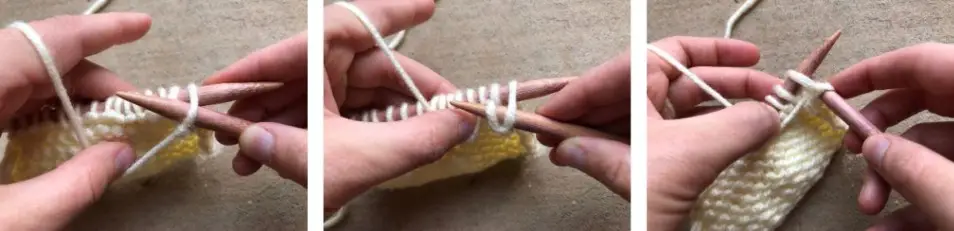
How to Make the Knit Stitch
- Cast on the required number of stitches. For some help, I have a link to this YouTube video that will walk you through the cast on. That’s a topic for another article.
- Hold the working needle (the empty needle) in your right hand and the other needle in your left hand.
- Use the working needle and insert the tip into the first stitch. Your needle should be pointing away from you.
- Yarn over the working needle from the back side.
- Bring the needle back through the loop to the front. Hold the yarn you just put on the tip the whole way.
- You should have one loop on the working needle.
- Continue this process until you run out of stitches.
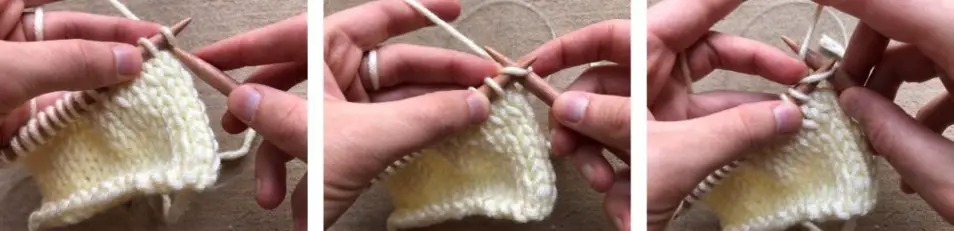
See how easy that was?! You just made your first row of knit stitches!
By the way, I am a continental knitter, so I hold the yarn in my left hand. You can do the exact same as I show in the photos with the yarn held in your right hand.
Now let’s dissect the process and look at our work so you can understand the basic construction of the knit stitch.
Knit Stitch Structure
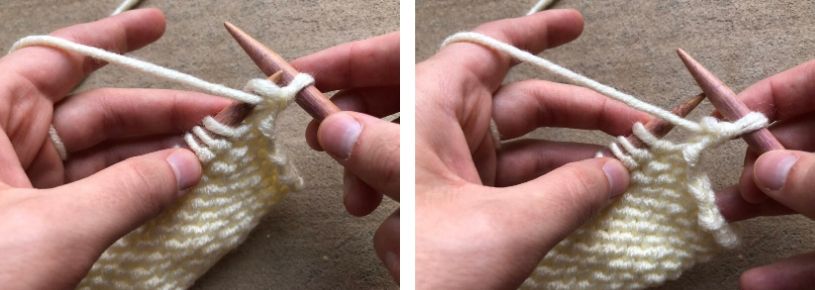
I’ve gone ahead and knit up a few more rows so we can see the knit stitch a little better. First, let’s notice the look of the fabric. The knit stitch creates a stretchy fabric that is made up of stitches that look like “v’s”. Take a look at the picture and just absorb that for a second. This is the right side of the fabric for a knit stitch.
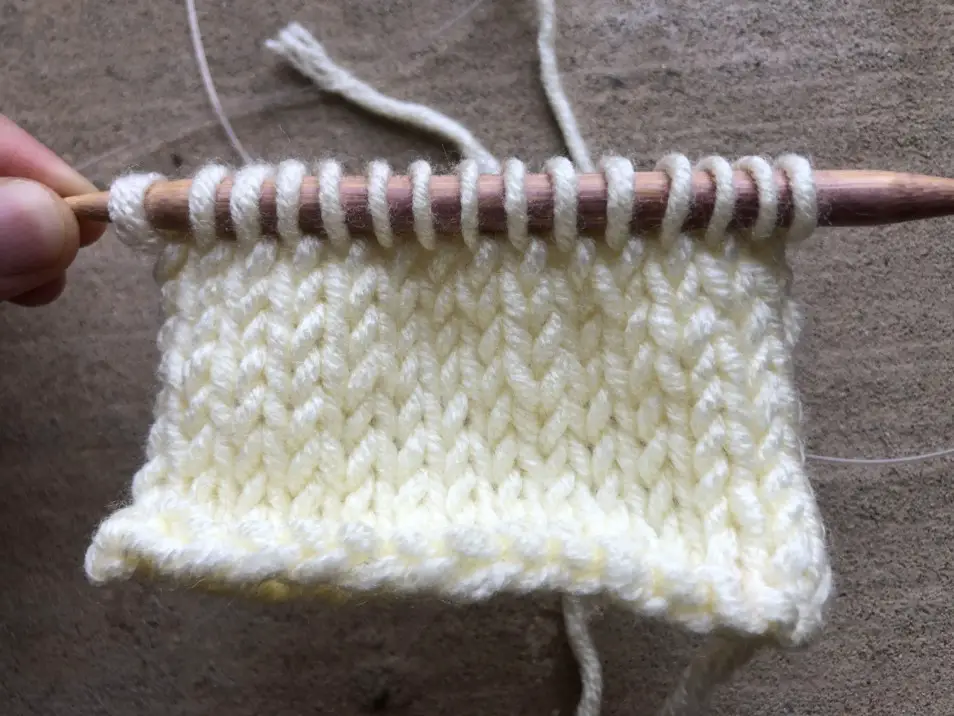
Now let’s bring our attention to the loops at the top that are on the needle. When you look at them like they are displayed in the picture above, they just look like vertical lines of yarn. Nothing special.
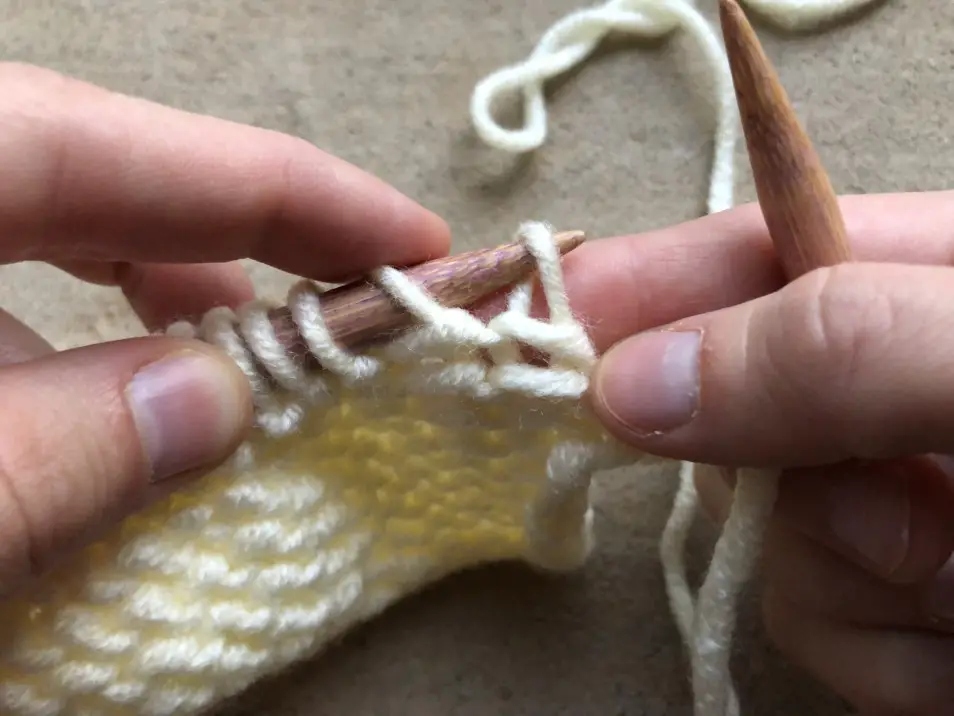
If you slide the first stitch over a little, there is more to observe. You will notice that the front part of the loop (closest to you) slants to the right, while the back part slants the opposite way. This is called Western knitting. I have a picture below to illustrate this concept. I put my finger behind the stitch so it’s easier to see.
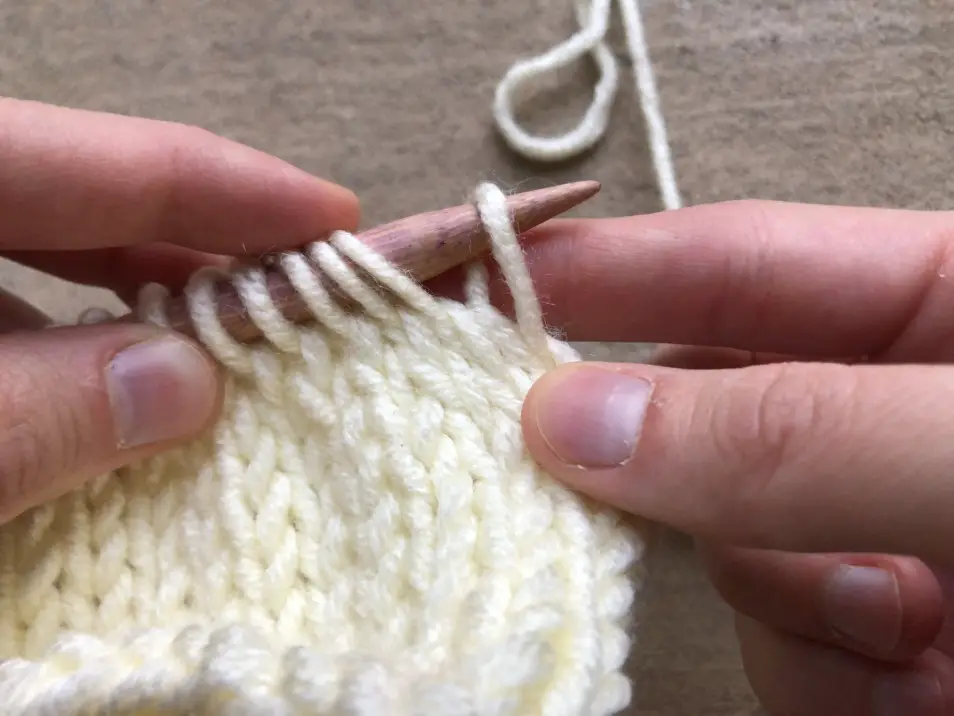
You might wonder why I bothered to show this to you. Trust me, it’s important. If stitches ever fall off the needle, you need to know how to properly put them back on the hook. If the stitch is put on the opposite way, the leading leg will slant to the left and this is called Eastern knitting. You will notice resistance when you try to make a knit stitch. Although, it is totally normal to knit the other way too.
I think we that pretty much sums up the knit stitch. It’s time to move on to the next important stitch, the purl stitch.
The Purl Stitch
When you get to the end of your first row of knit stitches (when using straight needles), you’ll quickly discover that the back side looks nothing like the front side. The back side of the knit stitch is called a purl stitch. Instead of “v’s”, there are horizontal ridges at the bottom of each stitch. Let’s look at it a little further.
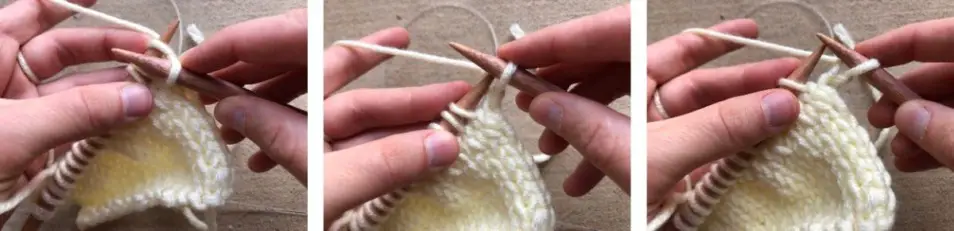
How to Make the Purl Stitch
Just as we went through the knit stitch, I want to walk you through the purl stitch so we can see a difference.
- Hold the working needle (the empty needle) in your right hand and the other needle in your left hand.
- Use the working needle and insert the tip into the first stitch from behind. Your needle should be pointing toward you.
- Yarn over the working needle from the front side.
- Bring the needle through the loop to the back. Hold the yarn you just put on the tip the whole way.
- You should have one loop on the working needle.
- Continue this process until you run out of stitches.
Not so hard, right? Some argue purling takes longer or is harder than the knit stitch, but I think at it’s core it is a super simple stitch.
Now that you are a pro at the purl stitch, let’s take a look at your work and understand the basic construction of the purl stitch.
Purl Stitch Structure
For this section, I am just going to flip over my piece and show you the purl side. The purl stitch looks like a lot of horizontal wavy lines. Look at the picture. It looks quite different from the knit stitch that we looked at earlier.
I’m going to show a close up now of the loops attached to the needle. They look very similar to the knit stitch, except notice how the stitches have a line under them. This is because purl stitches are made with the yarn held in front.
We can look at an individual stitch in the same way we did with the knit stitch. You will notice that the leading leg of the stitch (part closest to you) slants to the right. This is same direction the knit stitches leading leg pointed too. The purl stitch just looks more like a triangle.
Those are the basics of the purl stitch. In the following section, we are going to combine the two stitches into the same row and take a look at how to tell the difference.
Telling the Difference Between Knit and Purl Stitch When Combined
In this section, we are going to make ribbing because this stitch combination incorporates both the knit and purl stitches. This is where telling the difference is important.
I speak from experience. My problem most commonly happened when I set my knitting down in the middle of a row. I would forget if I left off on the purl or the knit stitch. I finally got tired of ripping out my work because I guessed wrong, so I took a look to see if there was a difference between the stitches. Turns out there is.
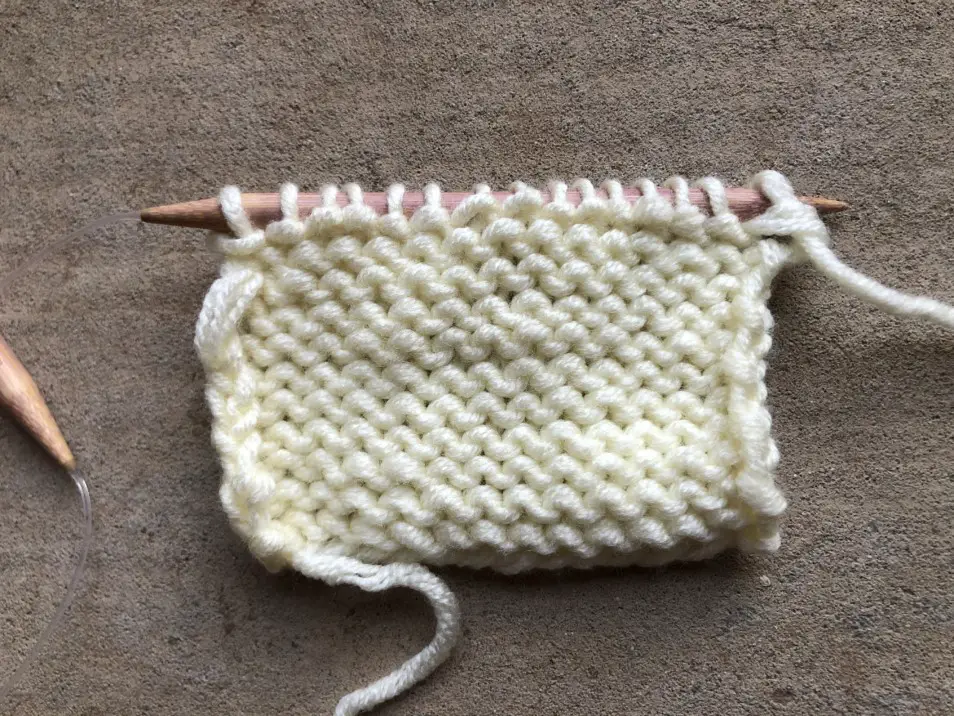
If you are still following along, I want you to knit 2×2 ribbing. This means you knit 2 then purl 2 and continue the pattern for a full row. When you are done, it should look something like the picture below.

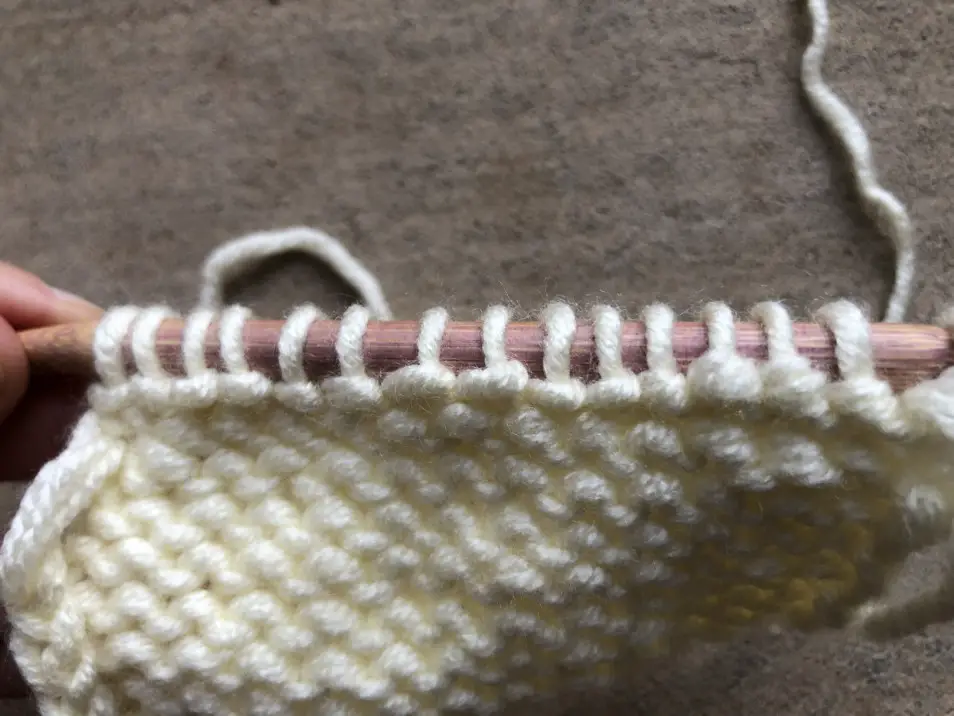
We will now apply what we learned in the first two sections of this post. What did the knit stitch and purl stitch look like on the needles? One of them had a line underneath…
The easiest thing to look for are the ridges formed by the purl stitch. This is your clue that you make purl stitches on top of those. So that we are all clear by what I mean, let me mark the stitches on the next photo.
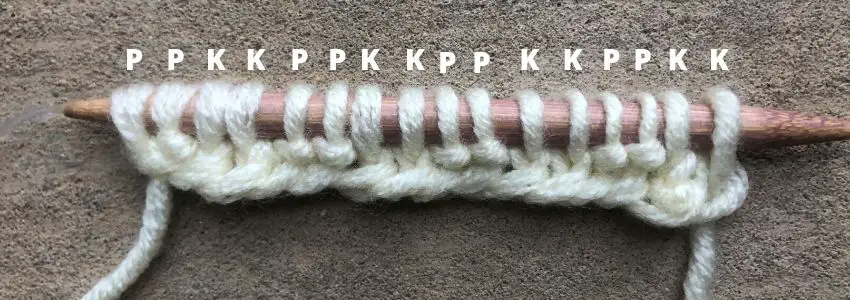
The P’s represent the purl stitches. You can see the line of yarn wrapped around the front of the stitch. The K’s represent knit stitches.
Fun fact, when you turn the fabric around, the opposite is true. The knit stitches on the back are purl stitches and vice versa. So you knit the opposite pattern when you turn your work over.
Finally, this is what the ribbing would look like with a few more rows added. Let’s see if you can tell the difference between the knit and purl stitches! I’ll help you a little. Remember, knit stitches create the “v” with yarn and the purl stitch looks like small lines.
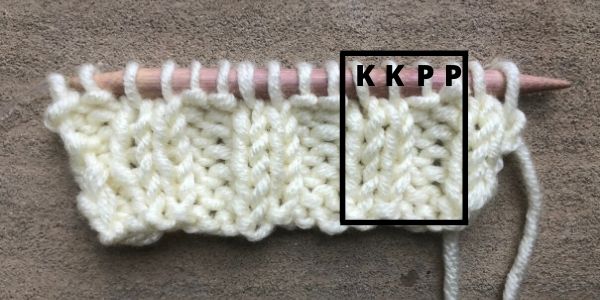
Not so bad right? I know you can do it! The more you practice, the easier it will get to instantly notice the difference.
Recent Posts
The Sole Hat: A Classic Knit-Look Hat Crochet Style | Free Pattern + Tutorial
If you're a crochet enthusiast looking for a timeless, cozy hat pattern with a unique twist, you're in the right place! Introducing Sole, the crochet version of the classic, chunky 2x1 knit ribbed...
Twofold is the Sew Homey take on a classic, chunky knit-ribbed hat with a folded brim. It features the same unique stitch combination and short rows as the Sole hat, but with a modification of stitch...